
Got LEGO® minifigures? We do. And I’m not going to tell you how many because it would be very, very embarrassing. Actually, I’m not sure that we could even come up with an accurate count. Aidan himself owns over 100. Then the other boys have their own collections and then there are the ones I bought for use in our LEGO® book…
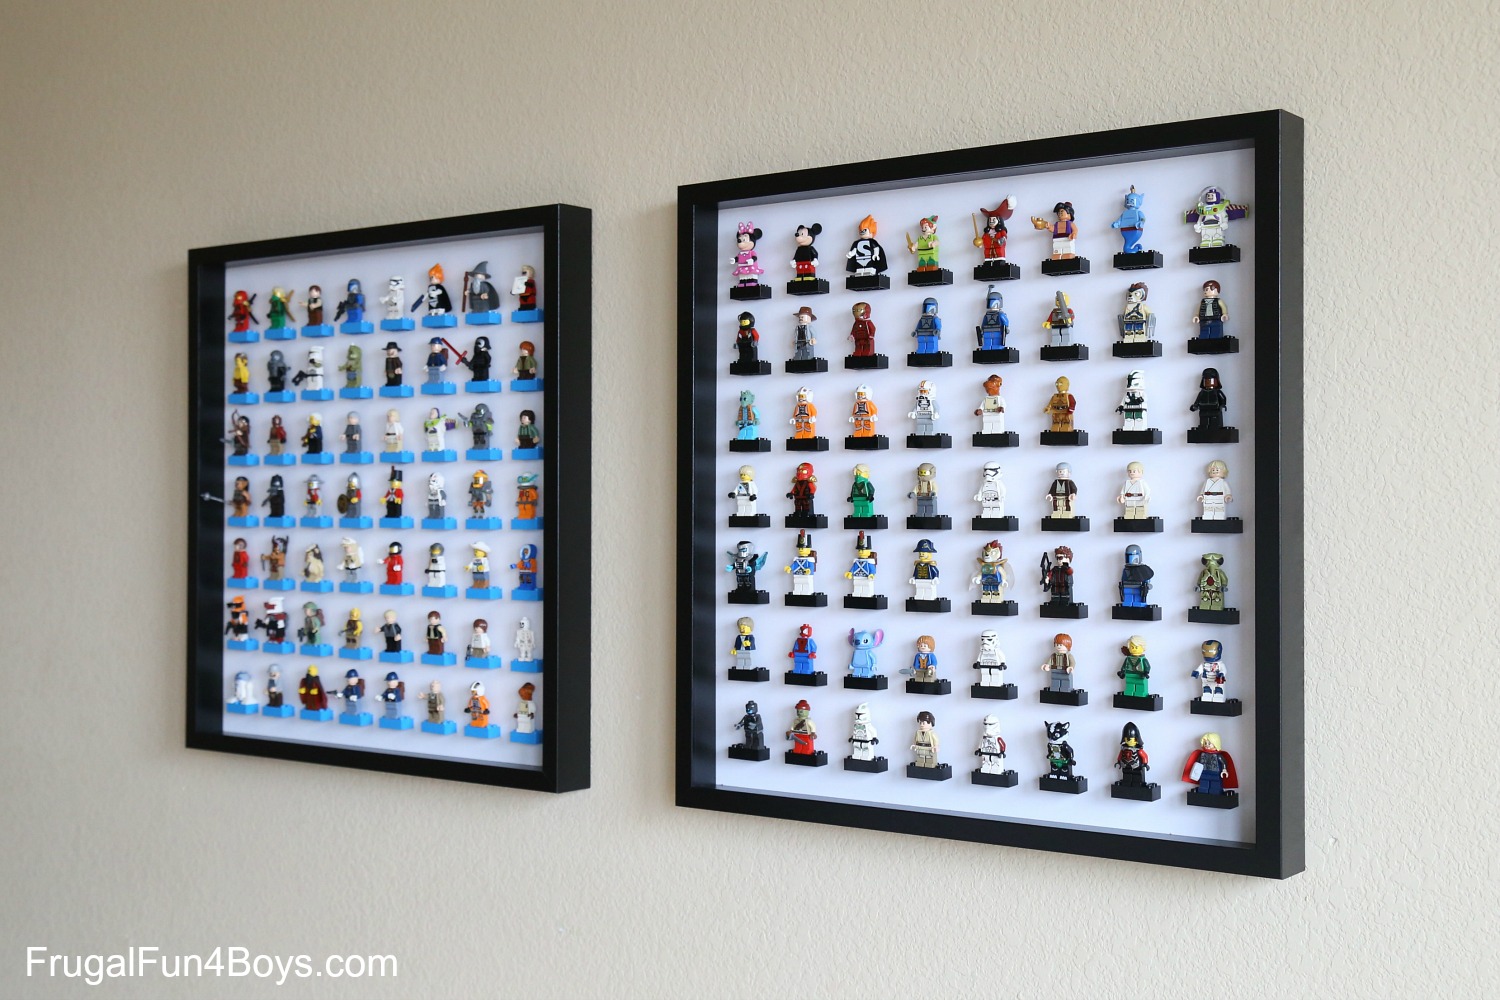
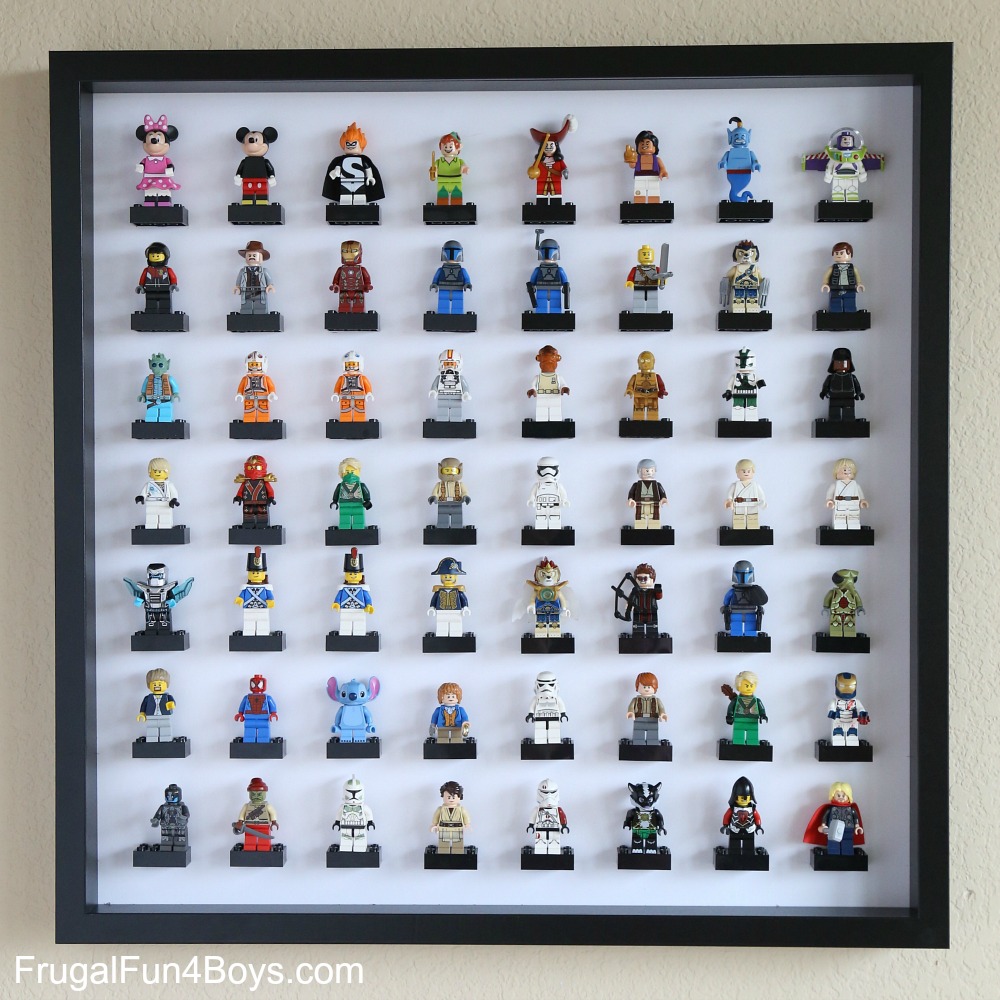
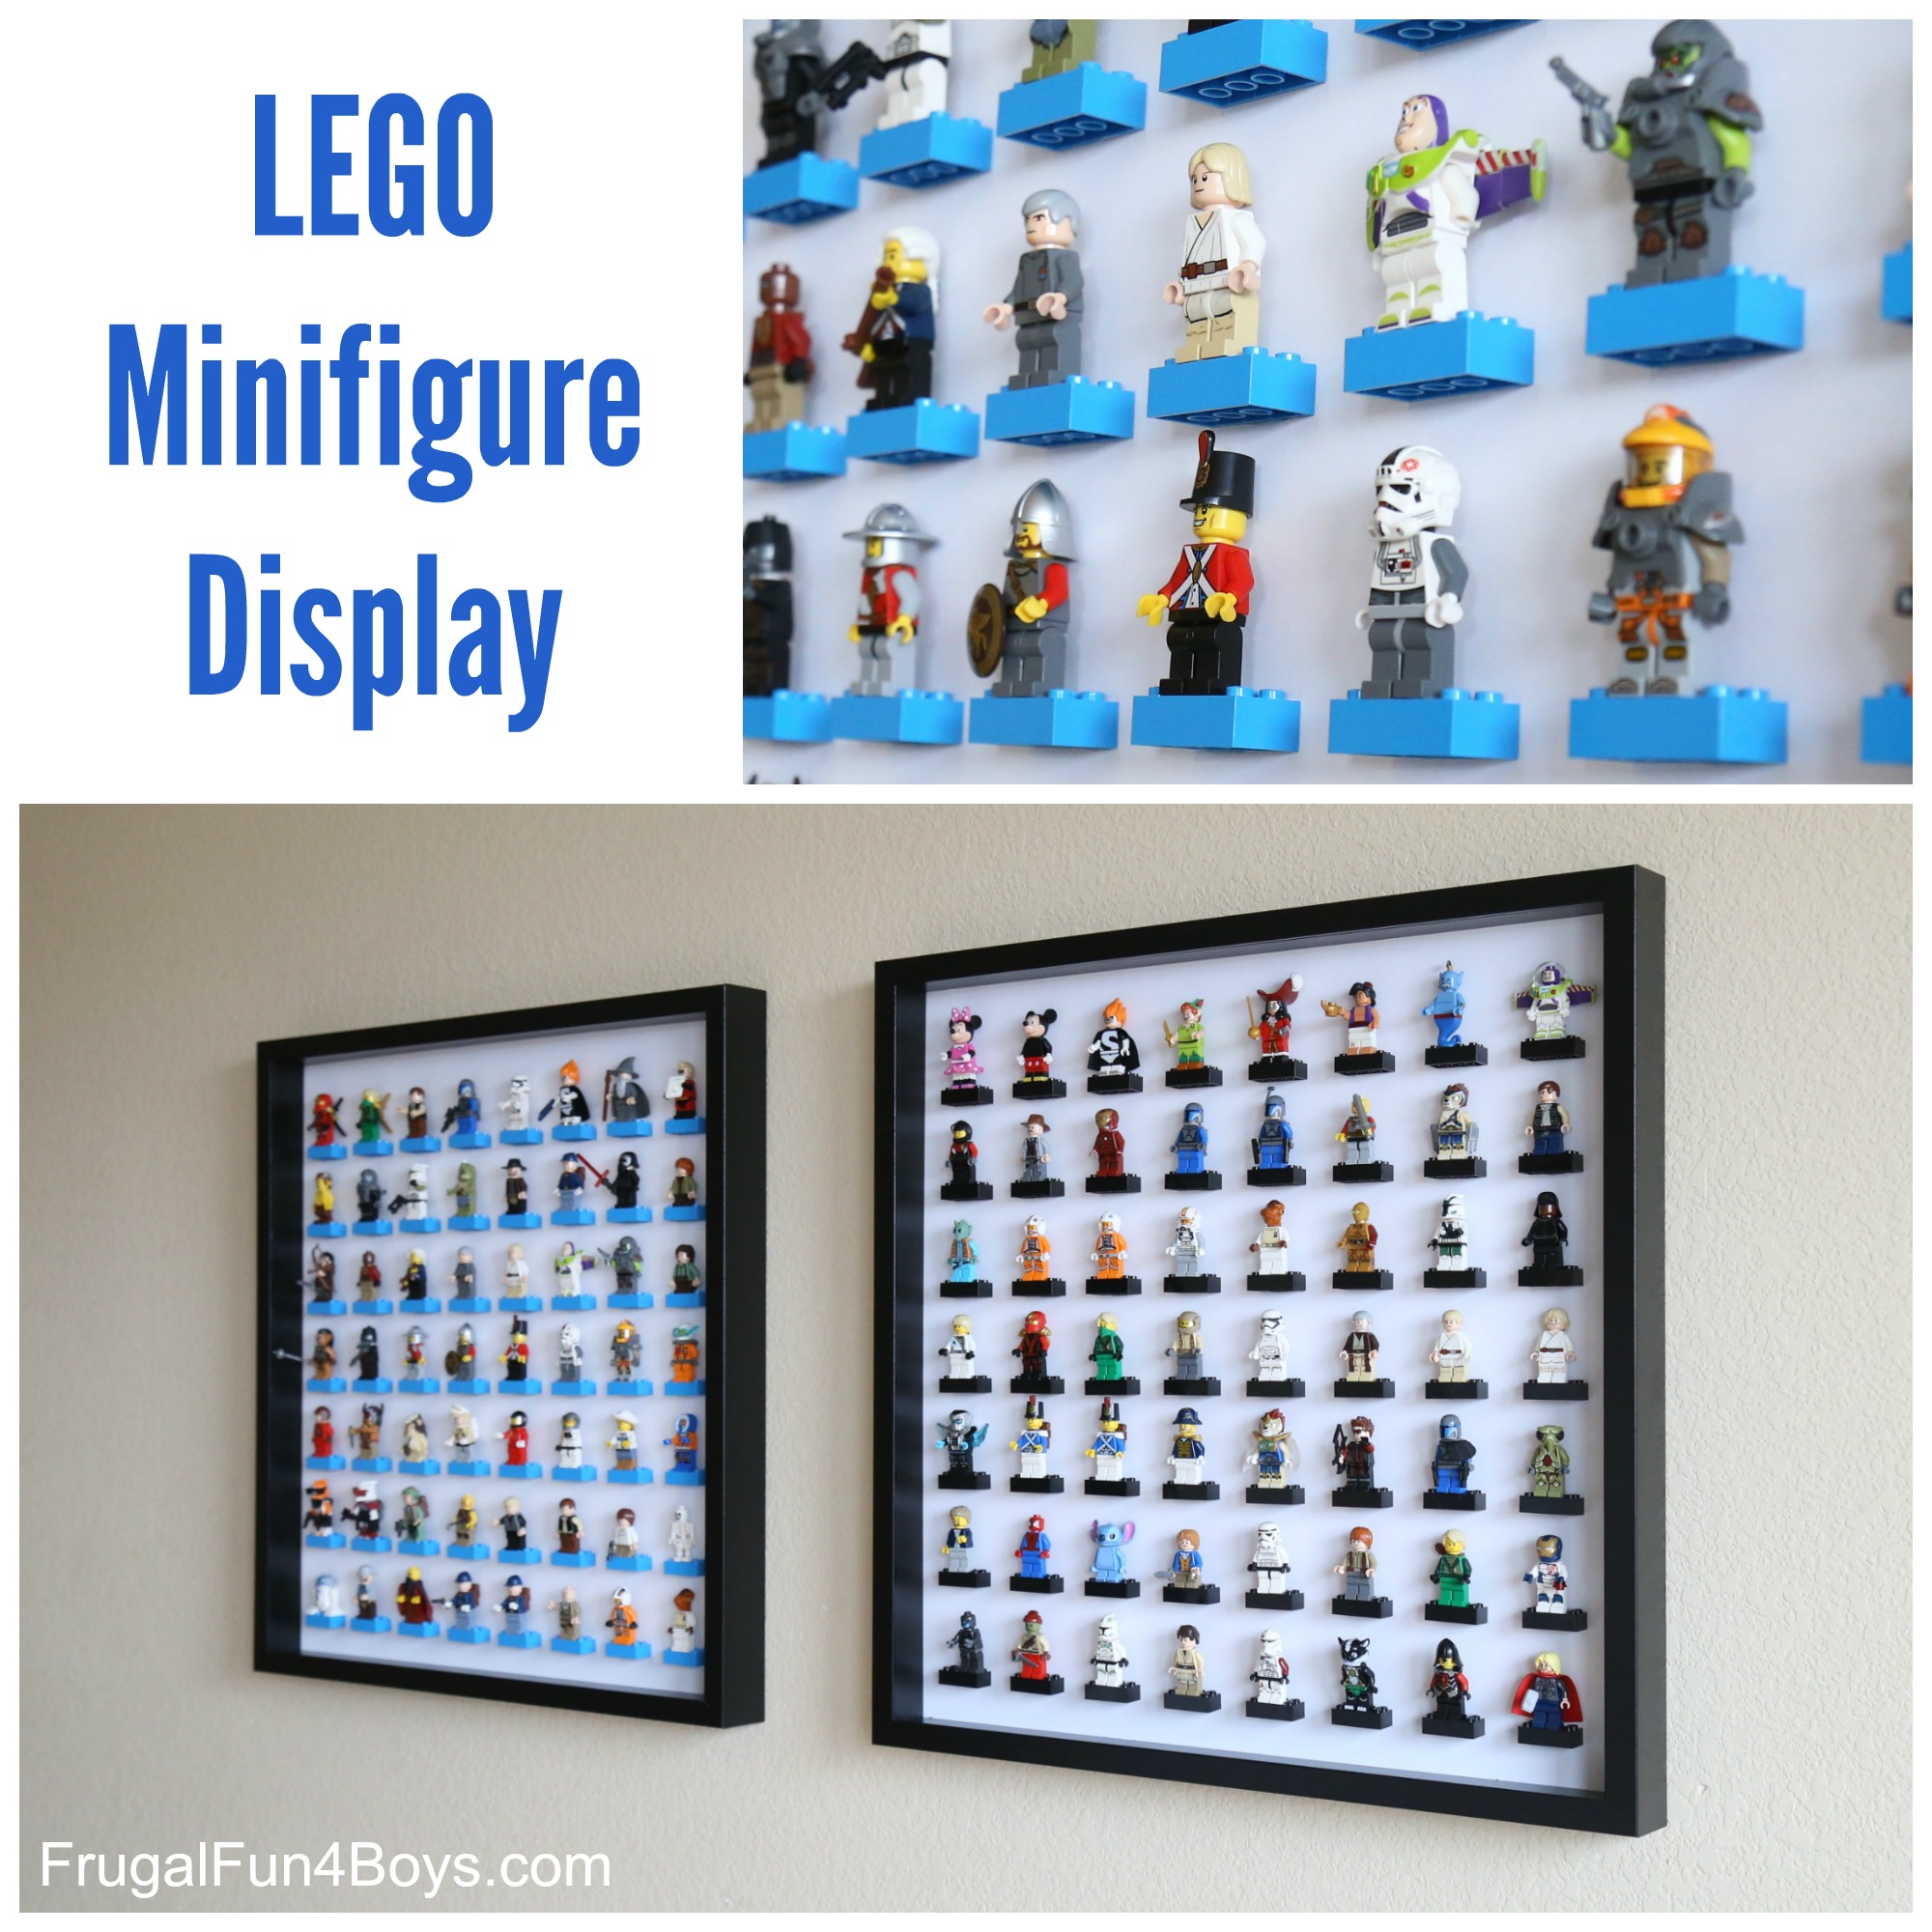
We were at IKEA last week, and found these awesome square frames that are just the perfect depth for displaying minifigures. Each frame holds 56 minifigures.
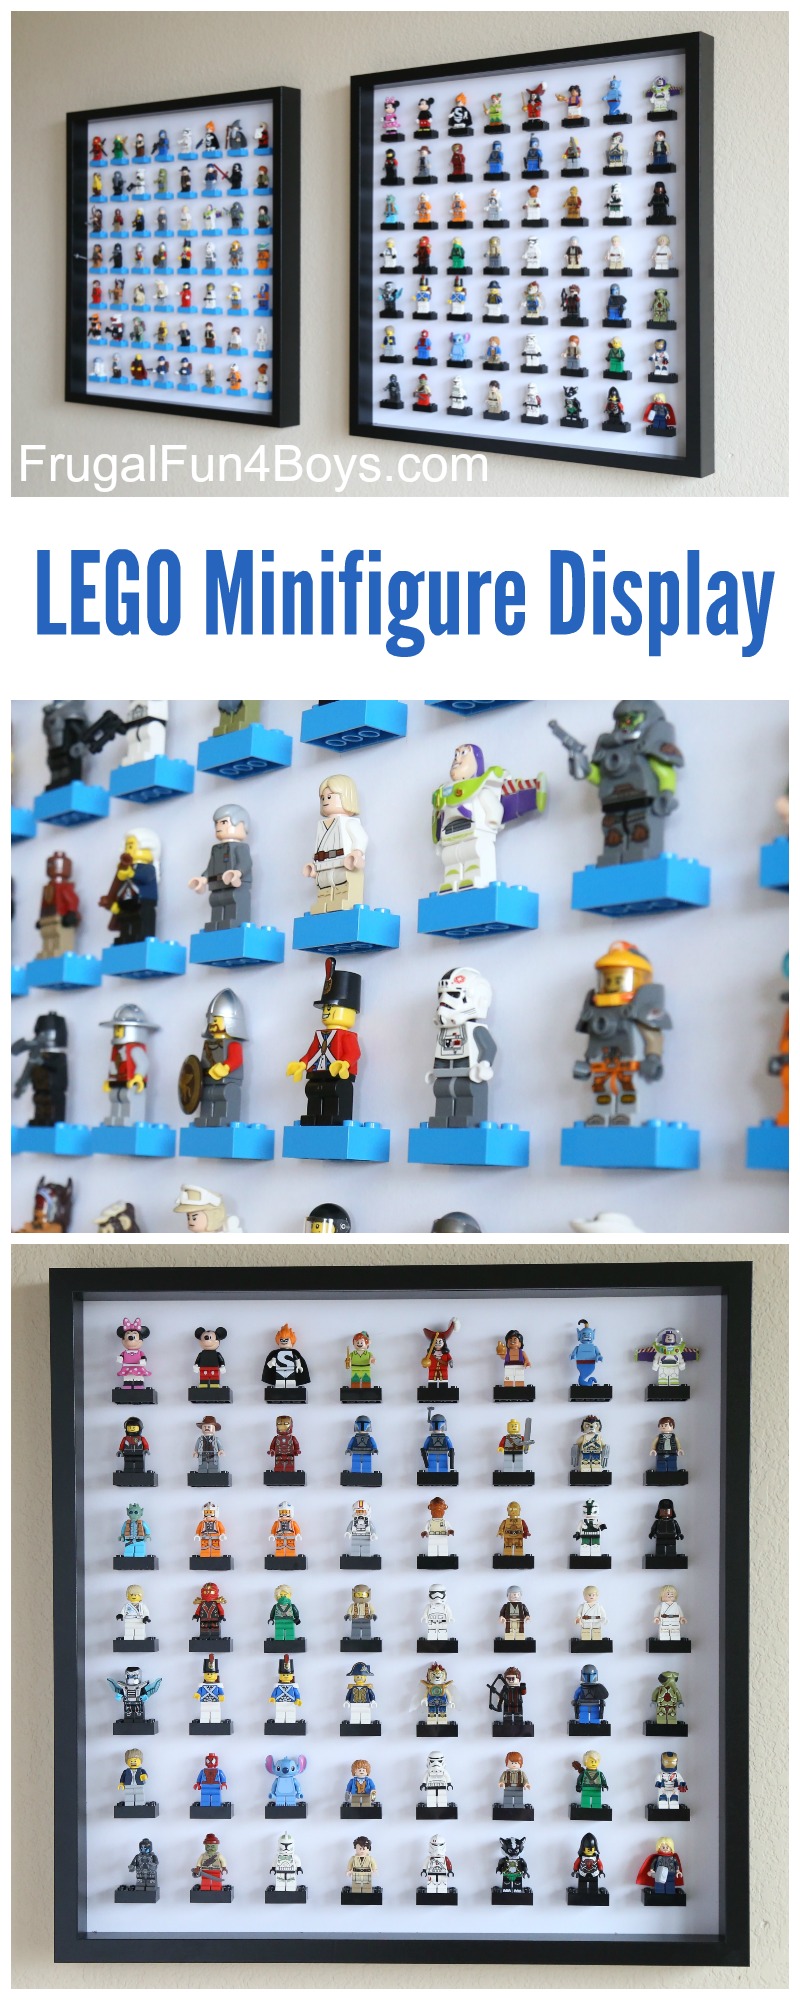
We hung our frames in our game room, and I really love how they look. I left the glass out so that the boys can switch out their figures whenever they want. Can you spot our new Disney minifigures on the top row? We have been having fun collecting these! They seem to be sold out almost everywhere, but we found a bunch at our local Legoland Discovery Center.
To make one you will need:
- 1 IKEA Ribba 50 cm x 50 cm frame ($14.99)
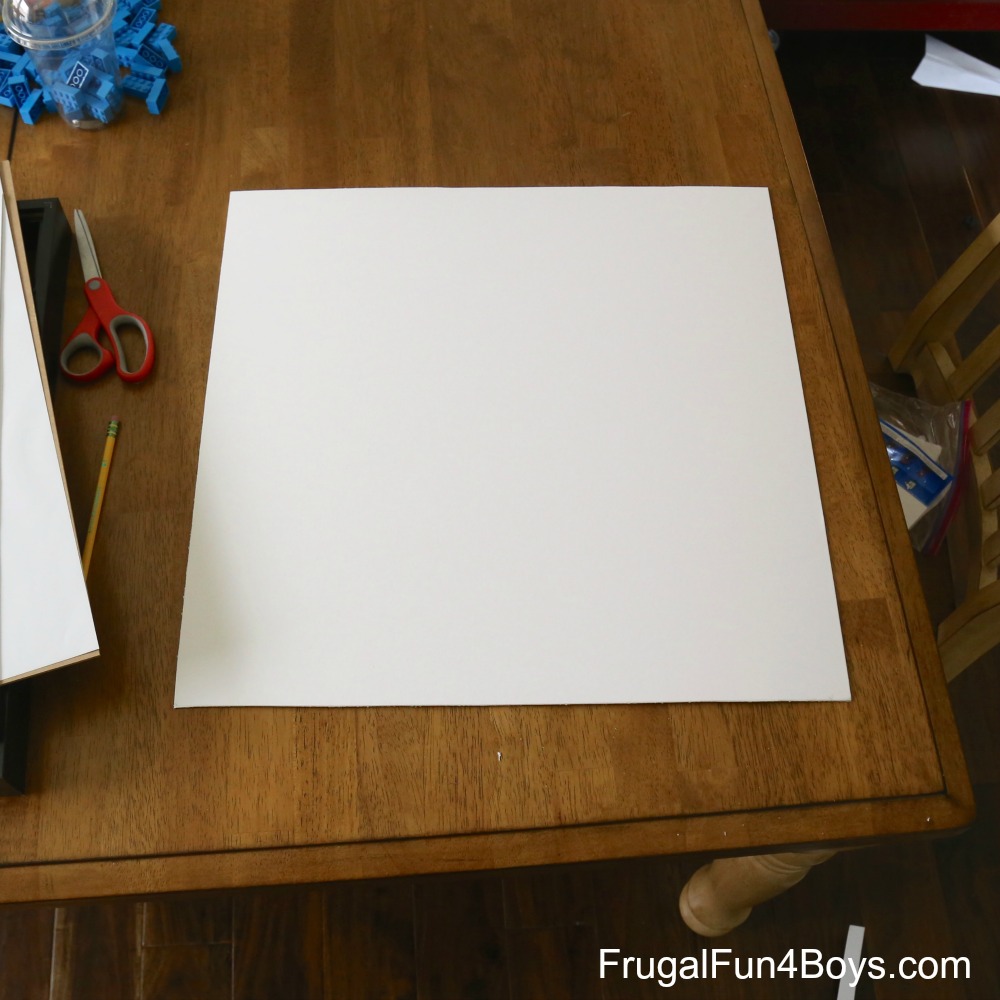
- White mat board – I got mine at Michael’s ($7.99 minus coupon)
- 56 2 x 4 LEGO® bricks (I spent $10 at the LEGO® store)
- Super Glue
- Pencil
- Ruler
- Scissors
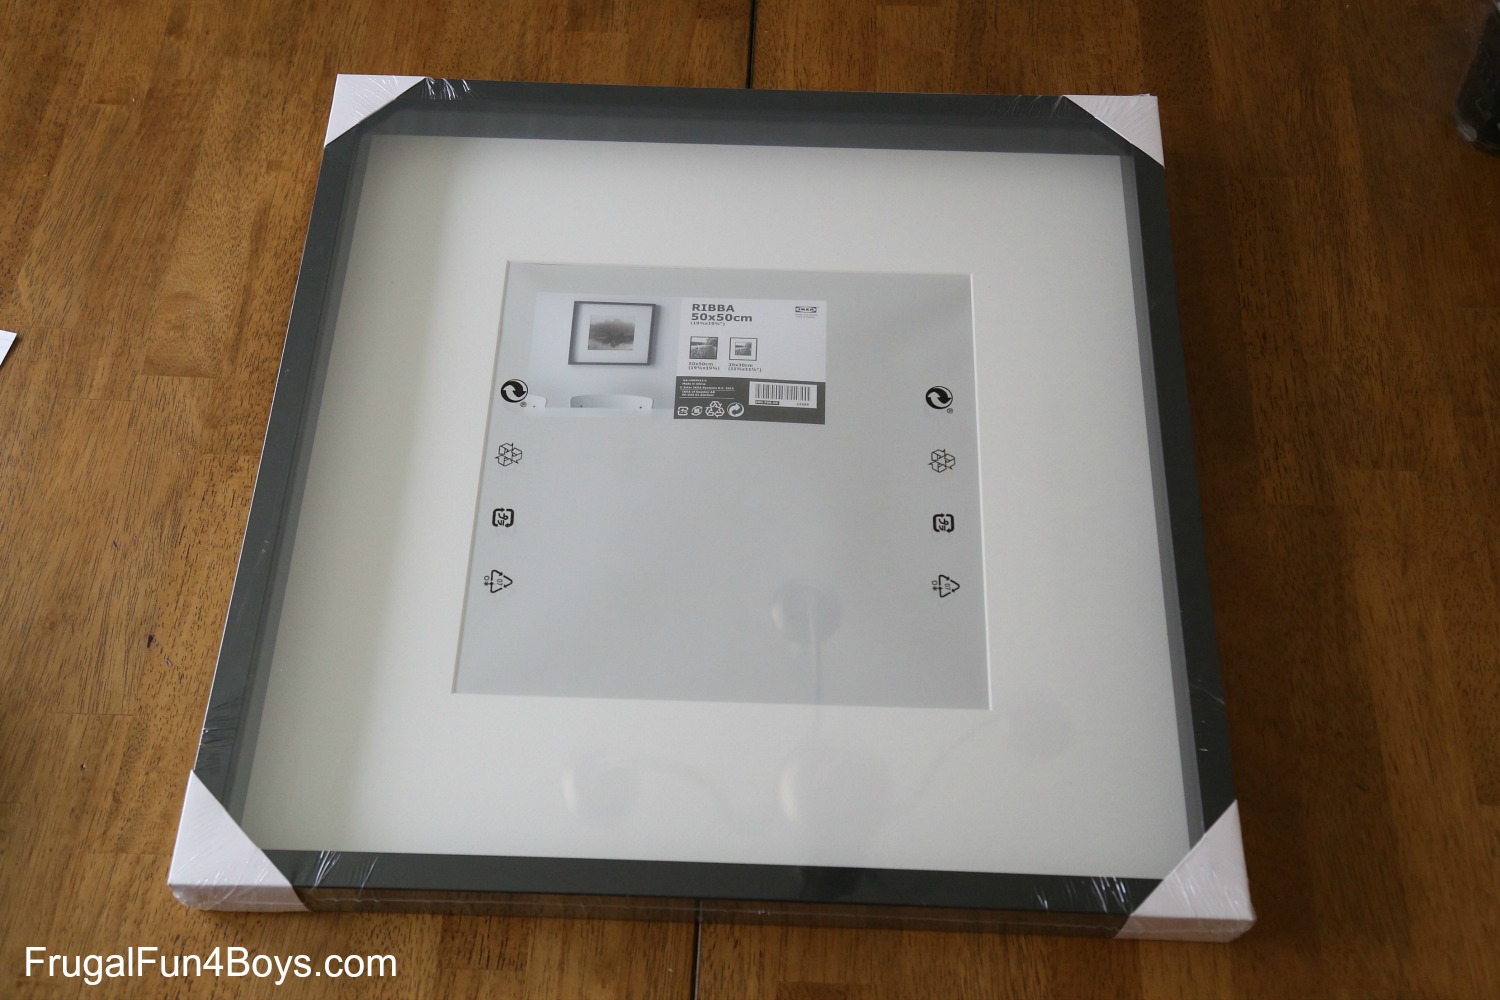
Step 1: Cut the white mat board to fit the frame. This will give you a solid piece of mat with no opening so that you can glue on the bricks. Remove the back of the frame and take out the glass and the mat. Trace the included mat on the white mat board, and cut out a square.

Now the new mat is ready to go!
Step 2: Measure and mark the spaces for the bricks.
Here is the diagram that I used to plan out the bricks. There are 8 rows of bricks with 7 bricks in each row. There is one inch of space on all sides.
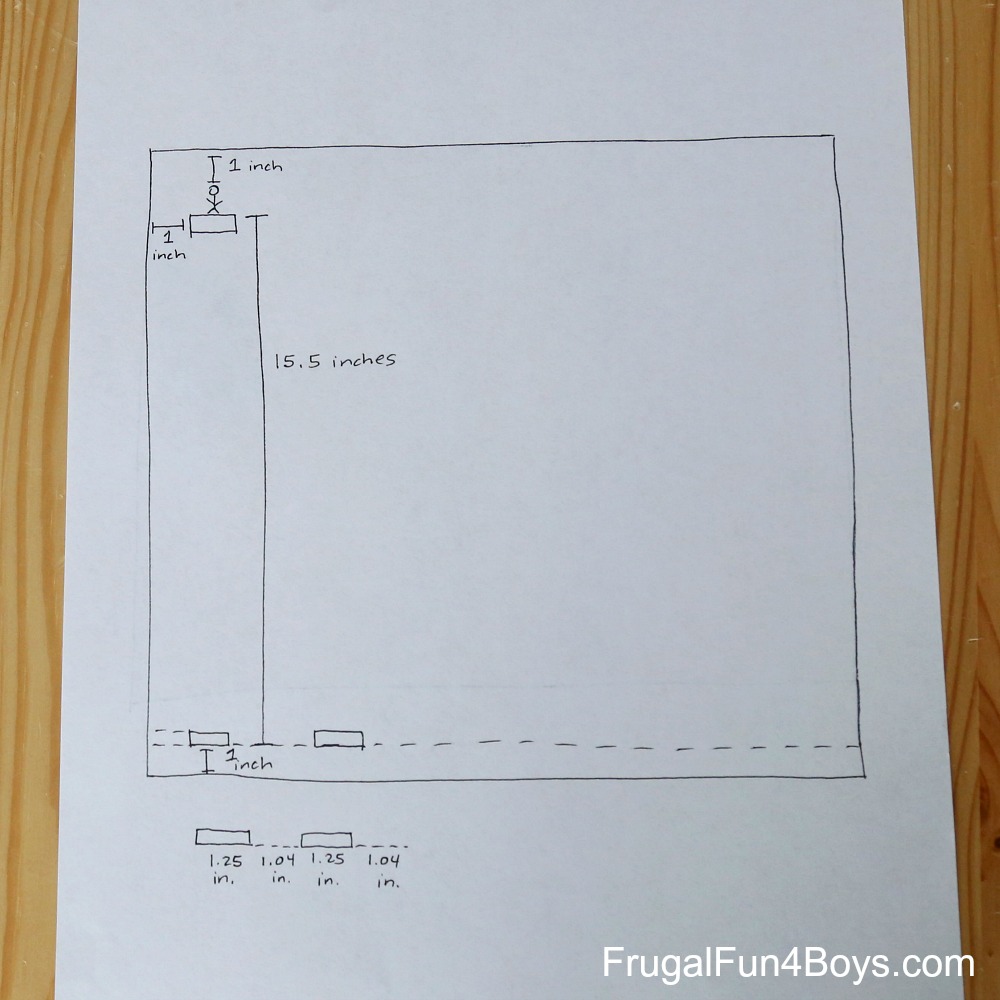
I reassembled the frame before marking the spaces.
Start with a horizontal line 1 inch up from the bottom. Then add horizontal lines every 2.52 inches. (I just did slightly more than 2.5 inches and it worked.) You will need 7 lines total.
Then mark where the bricks will go on each line. The spacing is shown in the diagram above. Start 1 inch over from the left edge. The bricks are 1.25 inches long. So mark 1.25 inches, then a gap of 1.04 inches, then 1.25, then 1.04, etc. You should end up with 8 bricks across, and the last brick should be 1 inch away from the right edge.
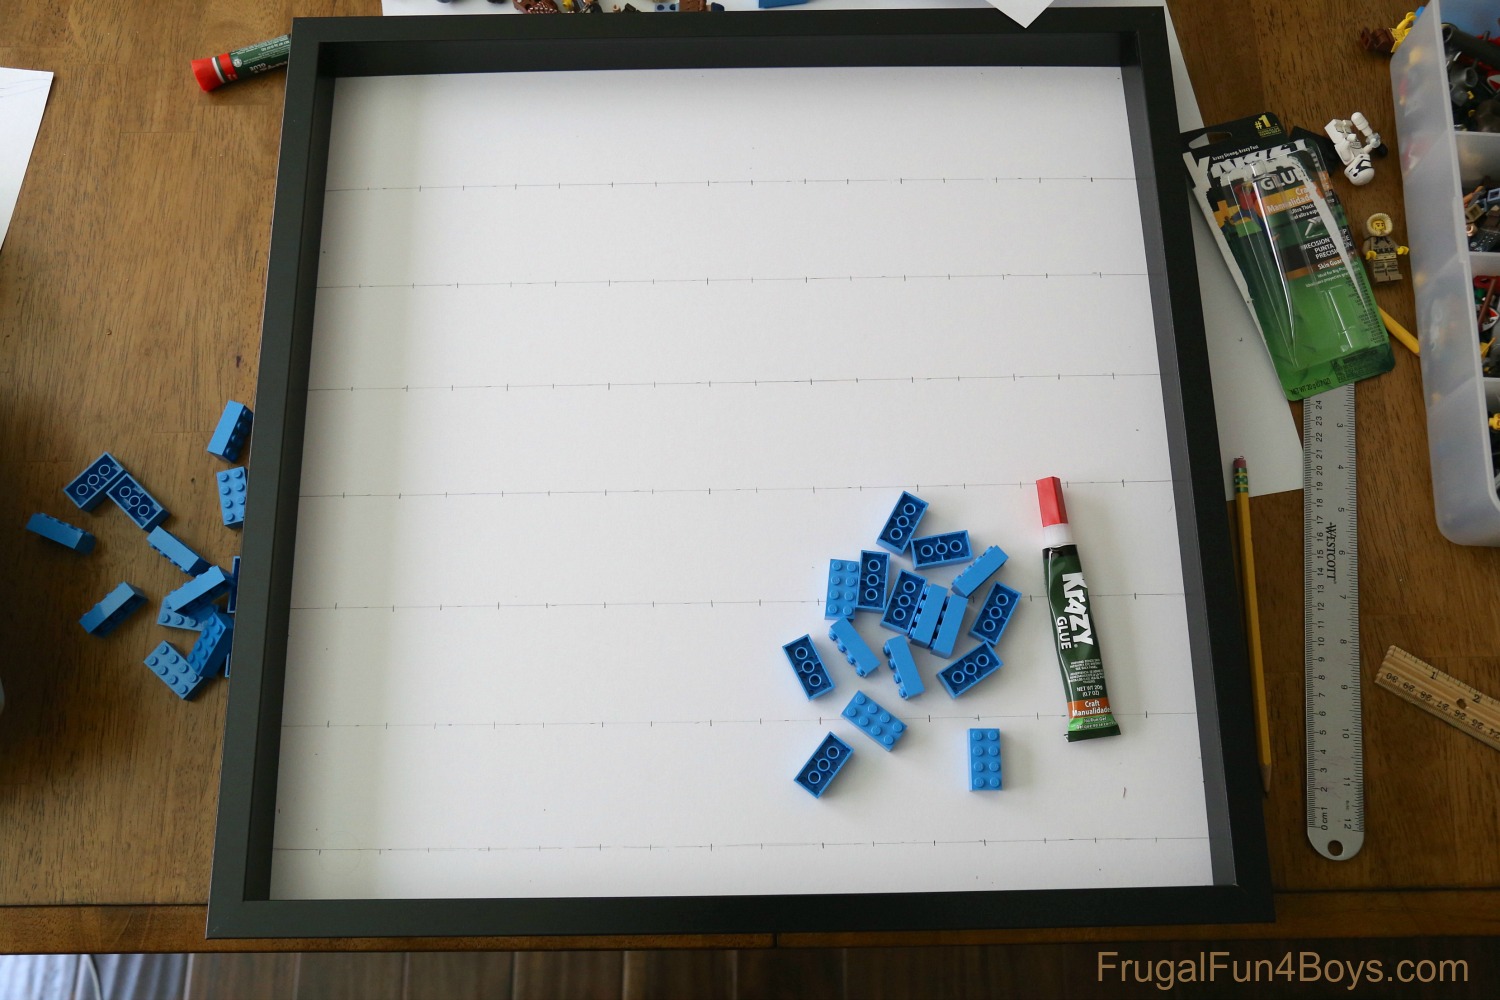
Step 3: Erase your extra pencil markings, leaving only the line that each brick will sit on, and glue the bricks. It’s difficult to erase after you have glued the bricks, so erase anything that will be seen.
Don’t use too much glue – any extra that squishes out will leave a white residue on the bricks.

Then load up your display with minifigures!
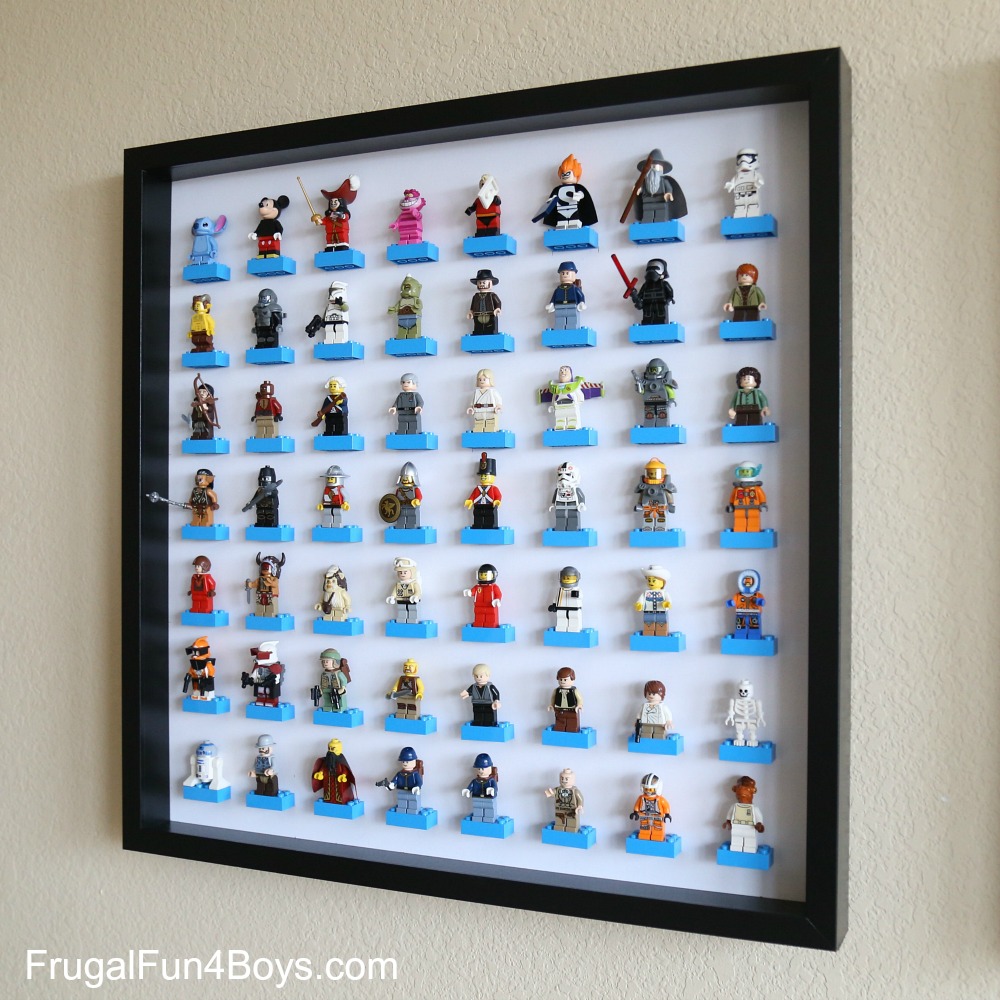
We used blue bricks for one frame and black for the other. I can’t decide which one I like better!
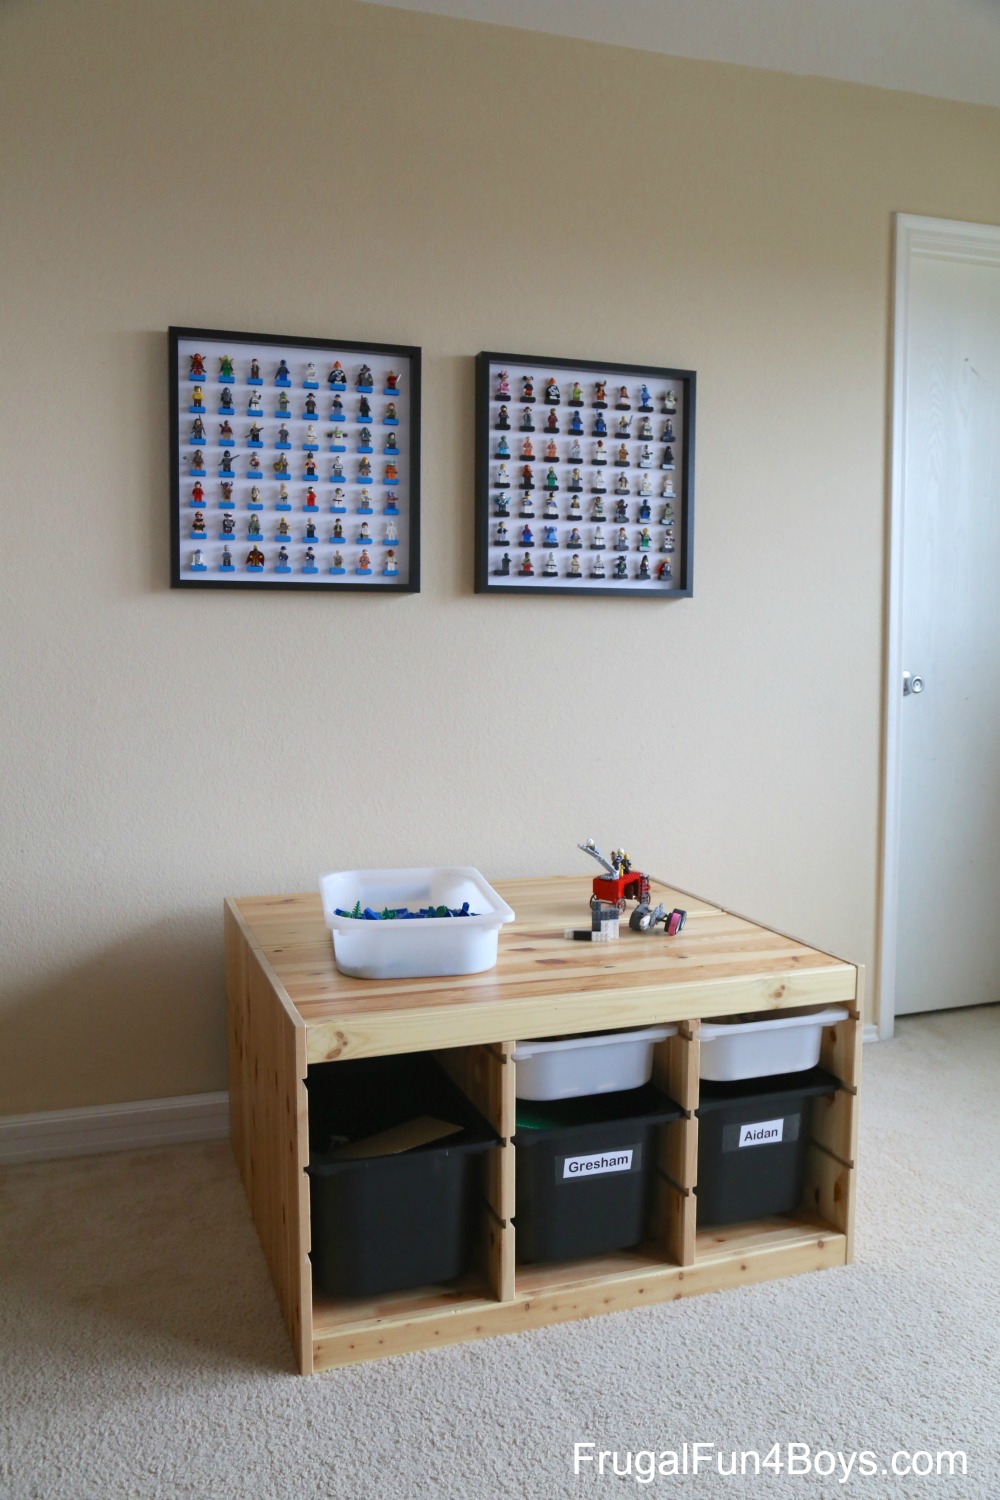
We hung our minifigure displays over our LEGO® table, which we built from IKEA Trofast storage units. You can see the LEGO® table here: IKEA LEGO Table
Besides LEGO® craft projects like this one, we also love to post LEGO® building ideas! You can see our LEGO® projects here: LEGO Building Ideas.
LEGO® is trademark of the LEGO® group of companies which does not sponsor, authorize, or endorse this site.
Also, be sure to check out our LEGO® book – Awesome LEGO Creations with Bricks You Already Have (affiliate link). This book is full of 50 new LEGO® projects to build, including parts lists and step-by-step instructions.
31 Comments
Colin May 20, 2016
awesome idea and sweet ego collection
Colin May 20, 2016
*lego collection
Sarah May 20, 2016
Thanks! :-)
Jo Mulholland May 23, 2017
Brings back memories of seeing my son's bed and floor- Lego pieces scattered everywhere! :)
Emma May 20, 2016
How cool! We only have 2 minifigs so we don't need one yet. I wish the figs themselves were so affordable, lol!
Kellie Jun 5, 2016
Amazon has deals where you can get a bag of these really inexpensively. They may not have the ones you're interested on sale, but just keep checking as they change in price all the time.
Kellie Jun 5, 2016
I love this idea!
If you can't afford to buy these, you can find legos at garage sales too. Hot Wheel cars and Legos are steals at garage sales compared to retail prices. Kids outgrow these and parents get tired of stepping on them ;) If you see other teen items for sale, ask the people if they have any legos they'd like to sell. It's something they don't always think about putting out to sell. Just clean them all in a big bucket with your favorite cleaner and you're good to go.
Rene Garcia Jun 13, 2016
Great idea, thanks for posting. I'm doing an all-white version with white bricks and the white version of the frame so the minifigs stand out.
Chris Jun 20, 2016
This looks great but I'm not seeing any reflection from the glass. I'm not sure if it's just the angle but has the glass not been put back in? The only reason I ask is the figures will get quite dusty without the glass.
Sarah Jun 25, 2016
We are not using glass in ours so that the kids can switch out which figures are on display. There is definitely room to put the glass back in if you are using it for display purposes only!
Theresa B Jul 2, 2016
Please note that I think the link to the frame is wrong. Ordered the one in the link: http://www.ikea.com/us/en/catalog/products/80243542/ and it doesn't let you put the mat in the frame deep and it's gray. I think you meant this frame? http://www.ikea.com/us/en/catalog/products/00078051/#/20078050 We are off to IKEA to return the gray ones and try the black ones instead that say "- You can place the motif on the front or back of the extra deep frame."
Sarah Jul 9, 2016
Yes, that's it! Thank you! I will add the new link. It was challenging to figure out which frame was which when they all have the same name!
Kimberly Jul 4, 2016
Have the bricks remained secure to the paper matting with the switching of minifigs?
Sarah Jul 9, 2016
Yes! They are doing just fine!
Tina Aug 4, 2016
How did you hang your your ribba frame so that it doesn't waver from side to side when the kids try to -not so gently- remove and replace the minifigures? Right now ours is nailed in the top center and it teeters from side to side if we apply any pressure.
Greg Oct 4, 2016
My previous caches dried up. Now I get my supplies of Lego minifigs from FiveBelow. Good luck!
Sarah Gardner-Cox Dec 7, 2016
How careful do your kids have to be when taking the minifigure down? I've just marked all of the spots so I can start gluing but I'm nervous about the durability. Thank you!
Vanessa Jan 25, 2017
Hi, can I check how do u enclose the frame with the glass?
Crystal Jan 26, 2017
How so these hold up after a lot of use? Did the bricks come unflued from the backing after the boys attached & reattached the lego guys several times?
Tim Feb 19, 2017
Hi Sarah,
Nice to meet you. I just wanted to thank you for sharing this awesome idea. I started this hobby of collecting figures not so long ago mainly the Bandai SHF series. Recently, a friend introduced me to Lego minifigure and I got hooked ever since then! It's so addictive collecting these minifigures and I currently have close to 50. a low figure compared to yours :)
As my collections grew, I started to wonder how am I going to display them neatly so I googled and stumbled upon your website. I thought the Lego frame was a really good idea and at the same time keep the figures free from dust. So I followed your instructions and managed to build one and it took half a day (I know it's a long time). It was not as easy as I thought though especially measuring the layout and making it perfectly aligned from one end to another. Mine is slightly slanted but not really noticeable hehe. Keeping the figures in its place is not easy as well if it comes with a bulky accessory.
Just to share, I got a white frame and a light beige mat just to give it a bit of color. I used a double-sided tape to stick the bricks as I thought it's neater and more user-friendly compared to super glue. It holds just fine. Only time will tell when it will start to peel off. Hopefully not. I'm definitely going to build another frame this time probably with a light green mat and beige bricks.
Oh like some users commented, these minifigures are really expensive but if you're interested you can get some bootlegs at the flea market at a fraction of the originals if you happen to visit Malaysia/Singapore and they come with various designs too.
Again, I love your fantastic sharing and it keeps me occupied during the weekends. Hope you'll continue to inspire us with more ideas.
Thank you.
British American Feb 16, 2019
I used doubled sided tape on mine and several fell off over time. I superglued the taped block back to the matt and then they are ok.
Ana I. Mar 25, 2017
Love it! Thanks for sharing!
Kirsten Apr 6, 2017
This is so brilliant! I've got my frame and bricks ready, but what do you mean by "white mat" please? Is it just card? Or mounting board? I'm in the UK and maybe we call it something else! Can't wait to begin! X
Sarah Apr 7, 2017
In the US, it's the type of cardboard that is placed in a picture frame. The frame might be 8 x 10 inches, but if the photo is smaller than that, they will have a piece of this mat board behind the glass, and it is 8 x 10 inches but with a smaller opening for the photo. Does that make sense? I didn't even know they sold whole sheets of it, but it worked well. It looks nicer than regular cardboard. I think any sturdy cardboard would work, though. Even a thin piece of wood would be okay.
elaine greene Jun 7, 2017
That is so brilliant! My little boy loves Lego and he has so much now this is just a perfect idea for displaying the figures. Thanks for sharing.
Sushmita Jul 4, 2017
Thanks a lot . I did it and my boys love it .
Chris Jul 19, 2017
Thanks fo posting this. I made three of these and they turned out great. I'm embarrassed to say we still have more minifigs left over to begin a fourth. I can't even imagine how much we and our family and friends have spent on legos for our kids over the years. I used poster board because I couldn't find a full sheet of matboard anywhere and it looks no different (and was a lot cheaper). i glued the poster board to the back of the frame for extra support (do this before you glue on the lego pieces). I used a picture hanger hook and mine doesn't wobble back and forth on the wall at all. Measuring and mapping out the layout takes the longest time but I made a "ruler" with markings for the spacing of the bricks with an extra piece of poster board so frames 2 and 3 were done in a fraction of the time. Thanks again and good luck everyone!
Kim Aug 8, 2017
Thank you for posting this with all the instructions. We made one today and we are so happy with how it turned out. Our Lego store was out of black bricks, but it looks good with white too. :)
Joanna Jan 7, 2018
Love this, thank you for the post! Where is the wood table with plastic bins from?
Theresa Jan 7, 2018
Did two for my kids and they love it! Thanks for the great idea?
Chasity Workman Dec 31, 2018
Great idea, thanks so much!
Kenna Feb 22, 2019
Wow! I can’t believe that I actually did this! It worked great! Thank you for the detailed directions and pictures. I used the white Ribba frame and white mat board with white legos. It’s already filled with minifigures so I’m thinking about making one with a black frame next. And I might invest in a better ruler too. Lots of measuring! Thanks again.
Jimmy Kudo Mar 23, 2019
Awesome! I can't wait to try it!!
Kevin Miller May 10, 2020
Just popping in to say I did this this weekend! The finished result looks great. (I went with 8 x 6 rather than 8 x 7 to space it out a bit) Thanks for the how-to guidance!
Victoria Andrews Jun 4, 2020
The display is great! Have you tried getting bricks and other pieces at Bricklink.com? I buy there all the time. Prices are fantastic and you can find everything you need much cheaper than the Lego store.
Sarah Jun 4, 2020
Yes! I really like ordering from Brick Link.
Adam Booth Feb 16, 2021
I have just made one of these frames. Sent the picture to a few friends and they are super jealous. I am really please with the end result. Thank you for taking the time to put it on the internet. Although i might have to make a couple more now HAHA
Phill Mar 4, 2021
Great Idea - I did the same with two slightly smaller frame I had
Fantastic idea and my boys keep their minifigures very tidy now 😊
Dries Apr 4, 2021
Hi,
Awesome idea! I bumped on this post a few months ago and now i ordered mine ribba :) A question about the white mat board, is it some kind of cardboard?
Sarah Apr 11, 2021
It's mat board from the framing department at the craft store. It's the board the goes around the border of a picture inside a frame.
Diane Jan 22, 2022
Your ideas are so creative and fun! We have four grandchildren who love all things LEGO, and they are currently organizing their “space” in the family room. They actually did count their mini figures lately. . .over 1,100 of them! 😃 Their grandpa and uncle also collect at our house, so the Lego company likes us at the holidays! Thanks for keeping us equipped with lots of fun ideas!
Katie Jan 27, 2023
So many great Lego ideas! Thank you for sharing =)
Post a Comment