
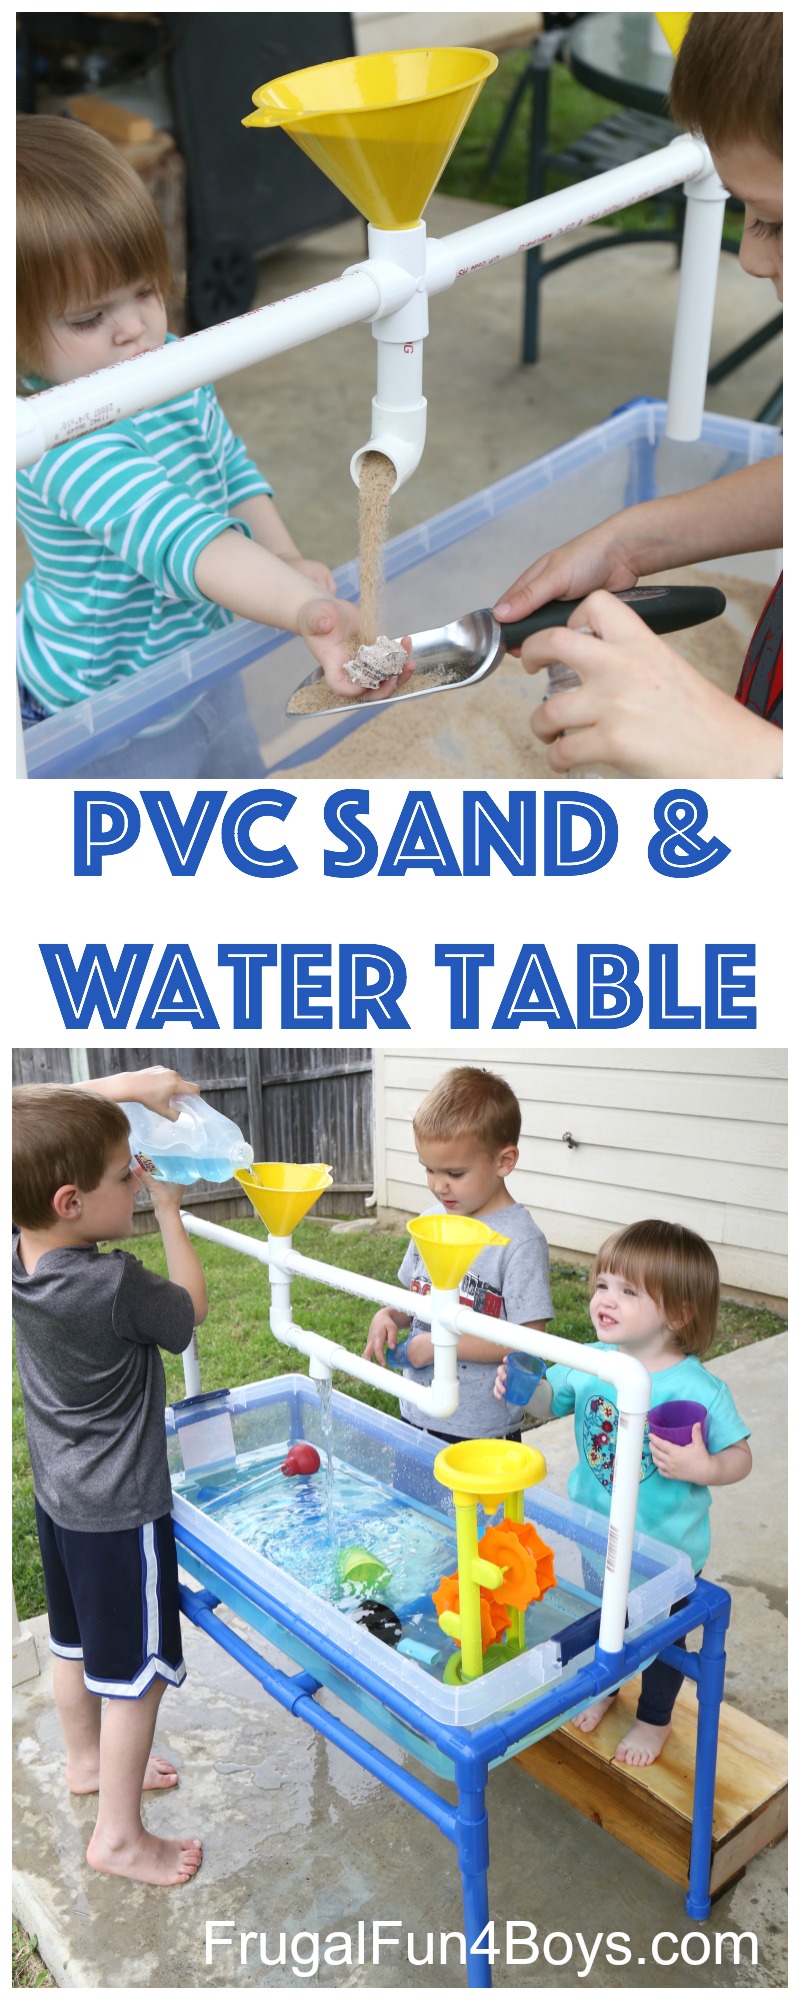
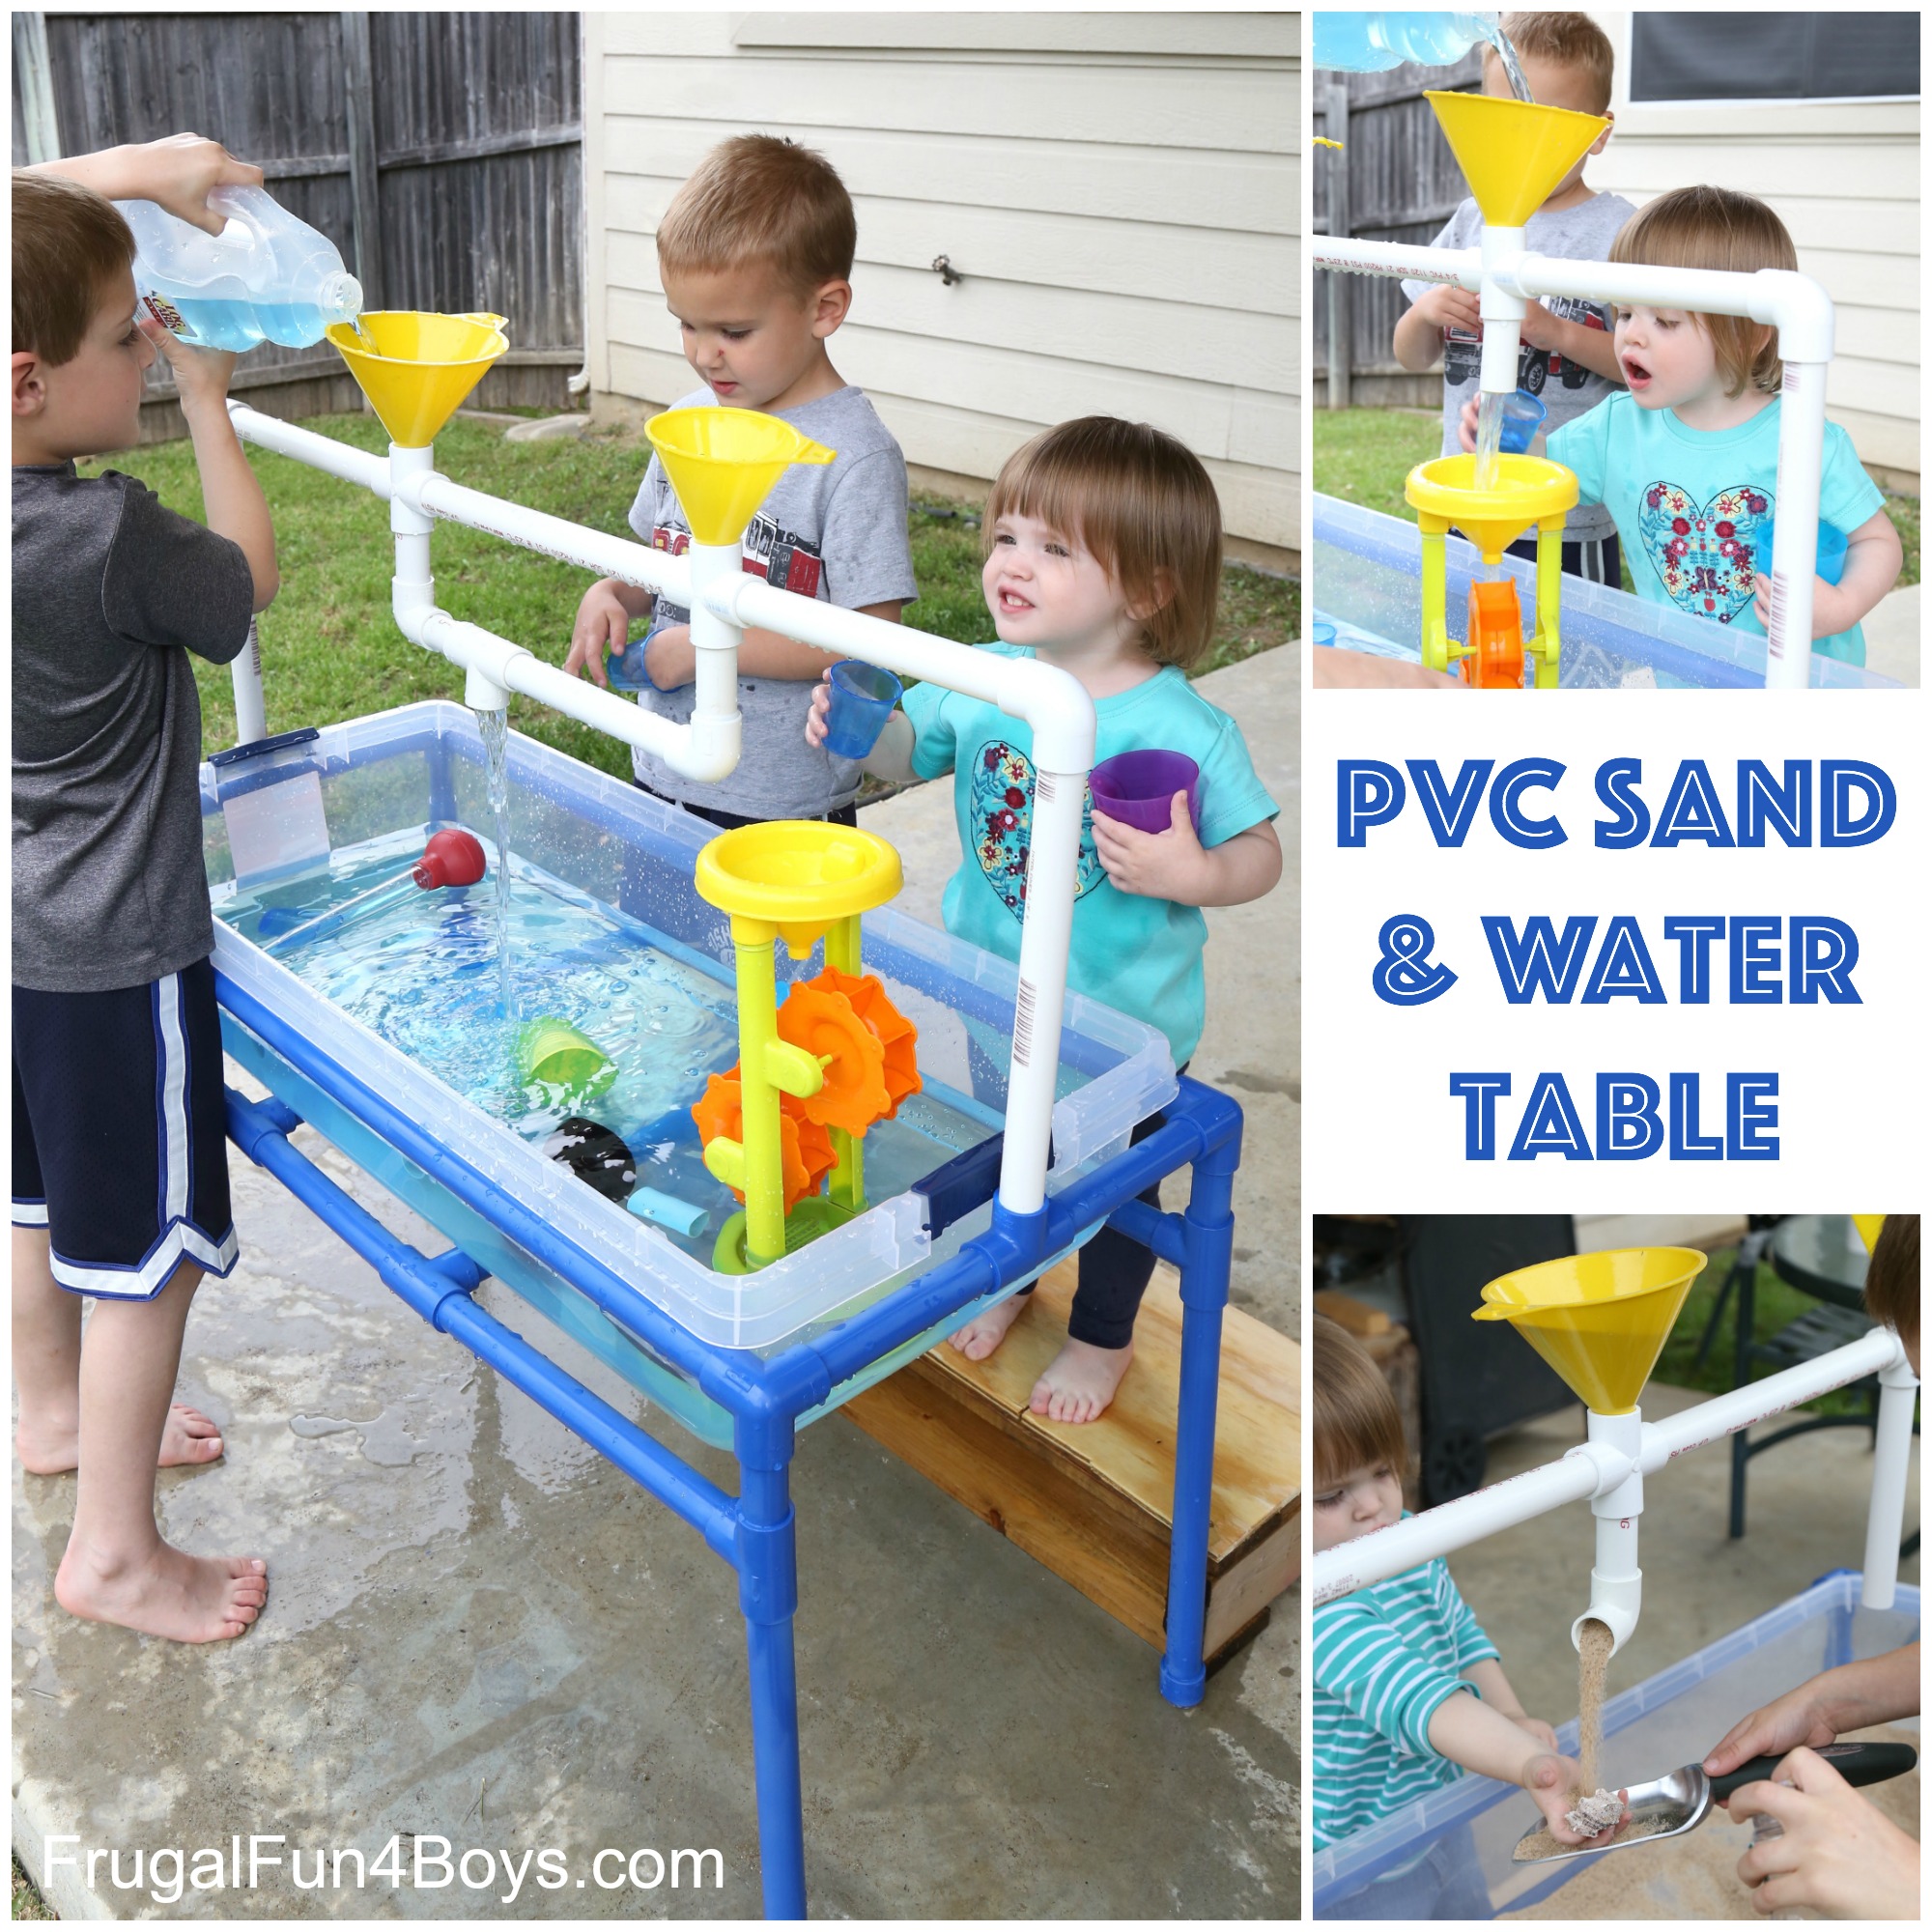
Use PVC pipe to make a sand and water table for kids!
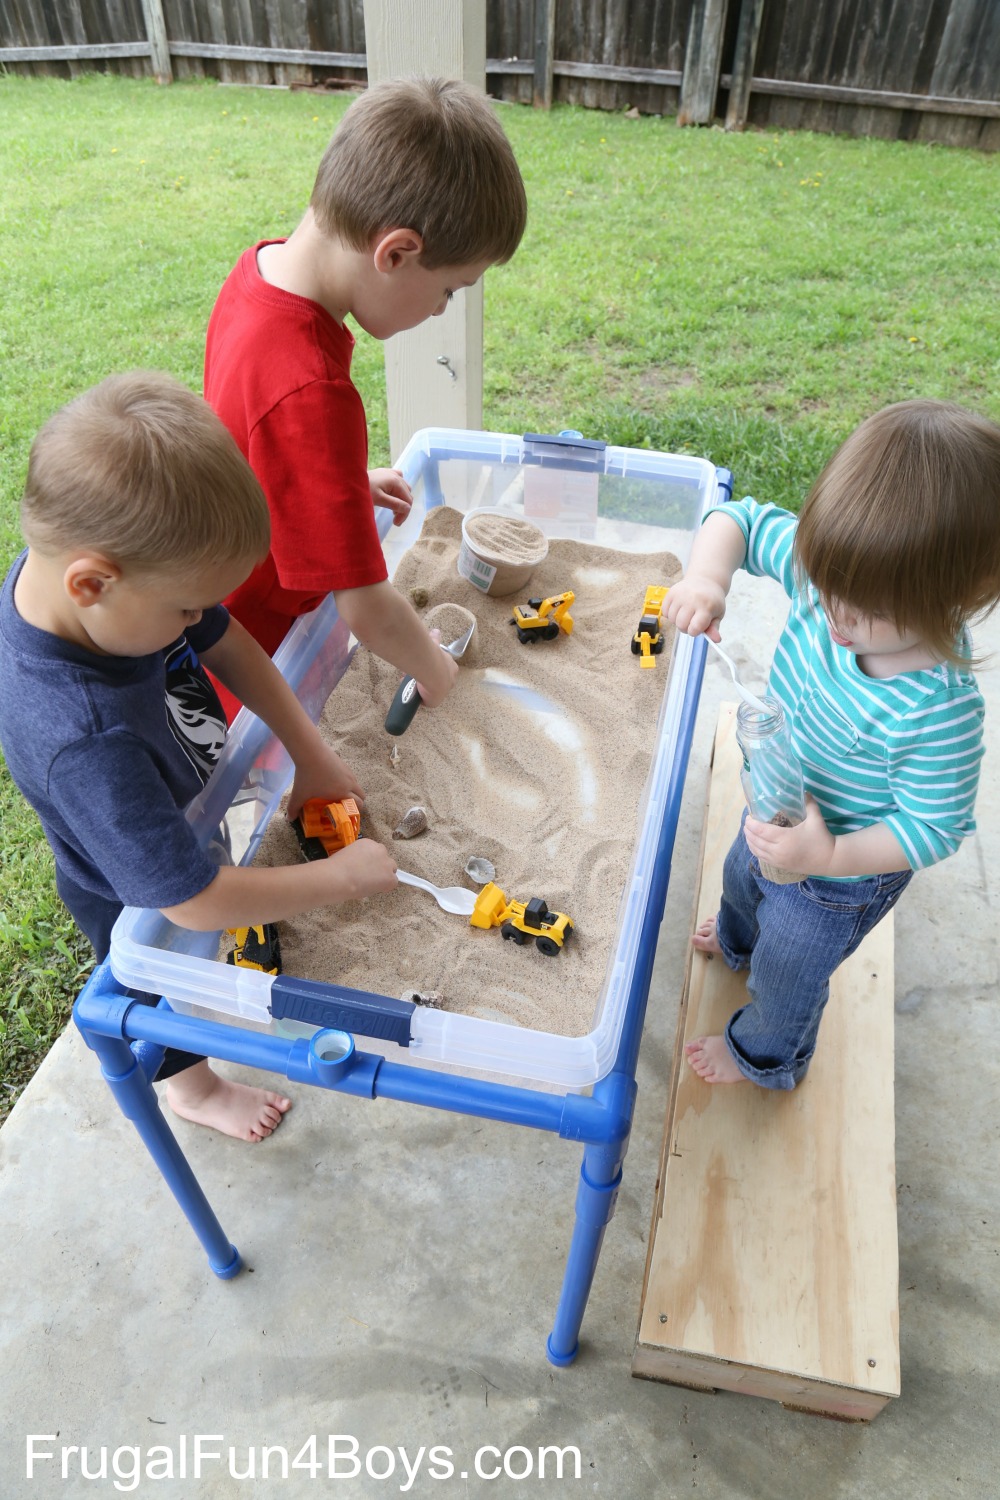
My 2, 4, and 6 year olds have been loving this sensory play table. I am loving the fact that you can change out the tubs and do either water or sand (or something else!) but not have both out at the same time. Maybe it’s just me being a little OCD, but I have never wanted a play table that has both water and sand on it. My toddlers would just turn both sections into both water AND sand, and I think I would constantly be replacing the sand.
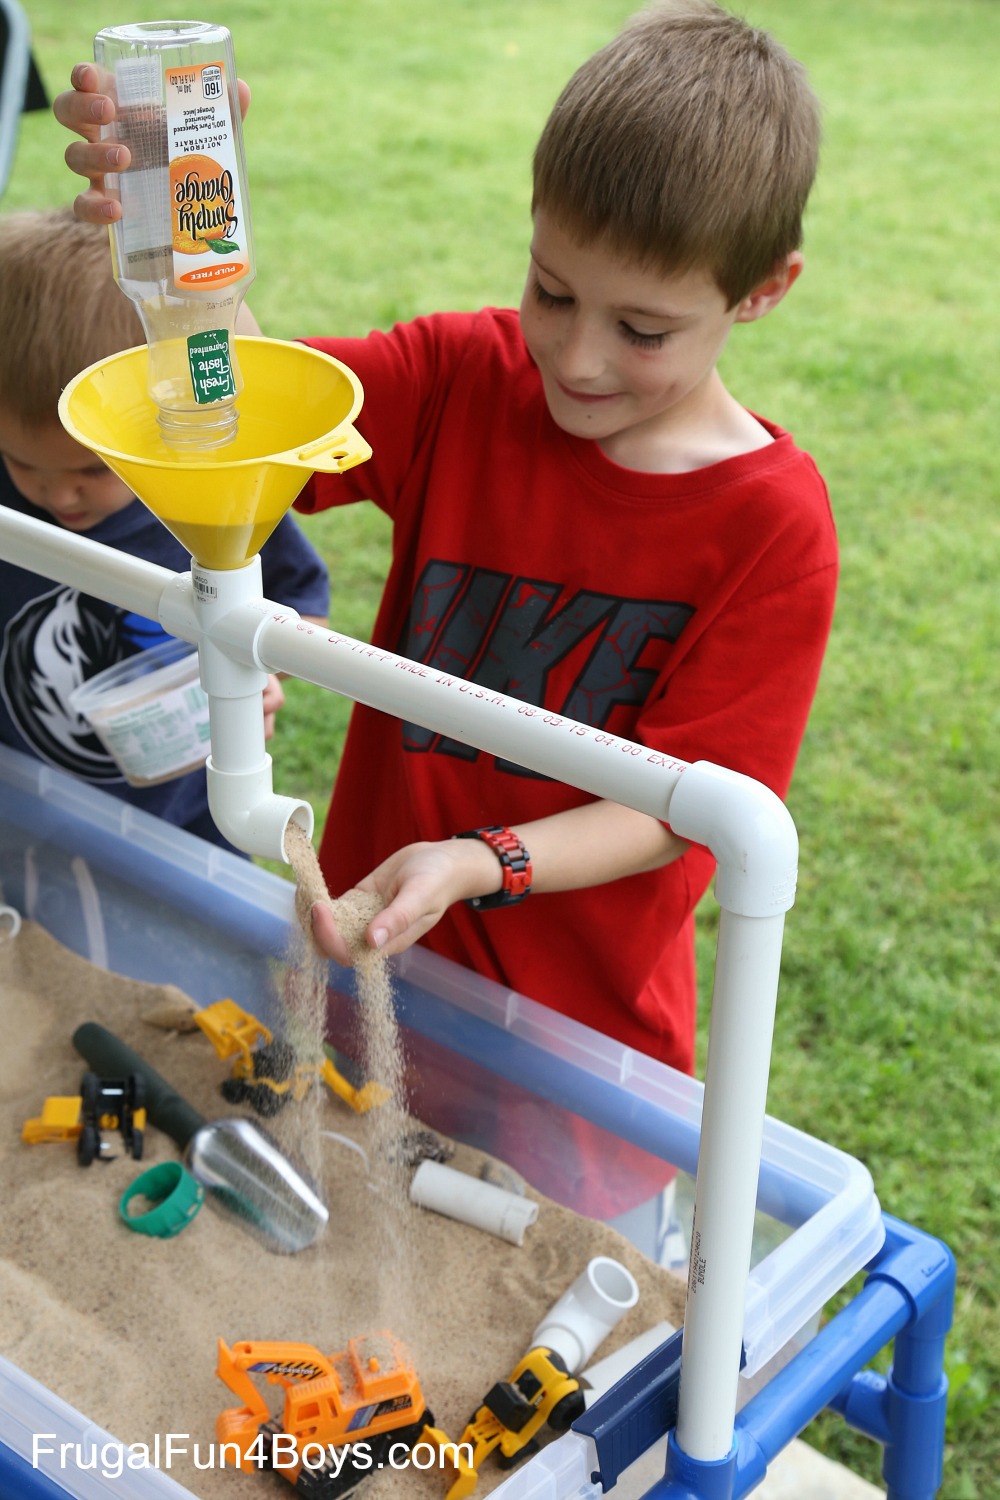
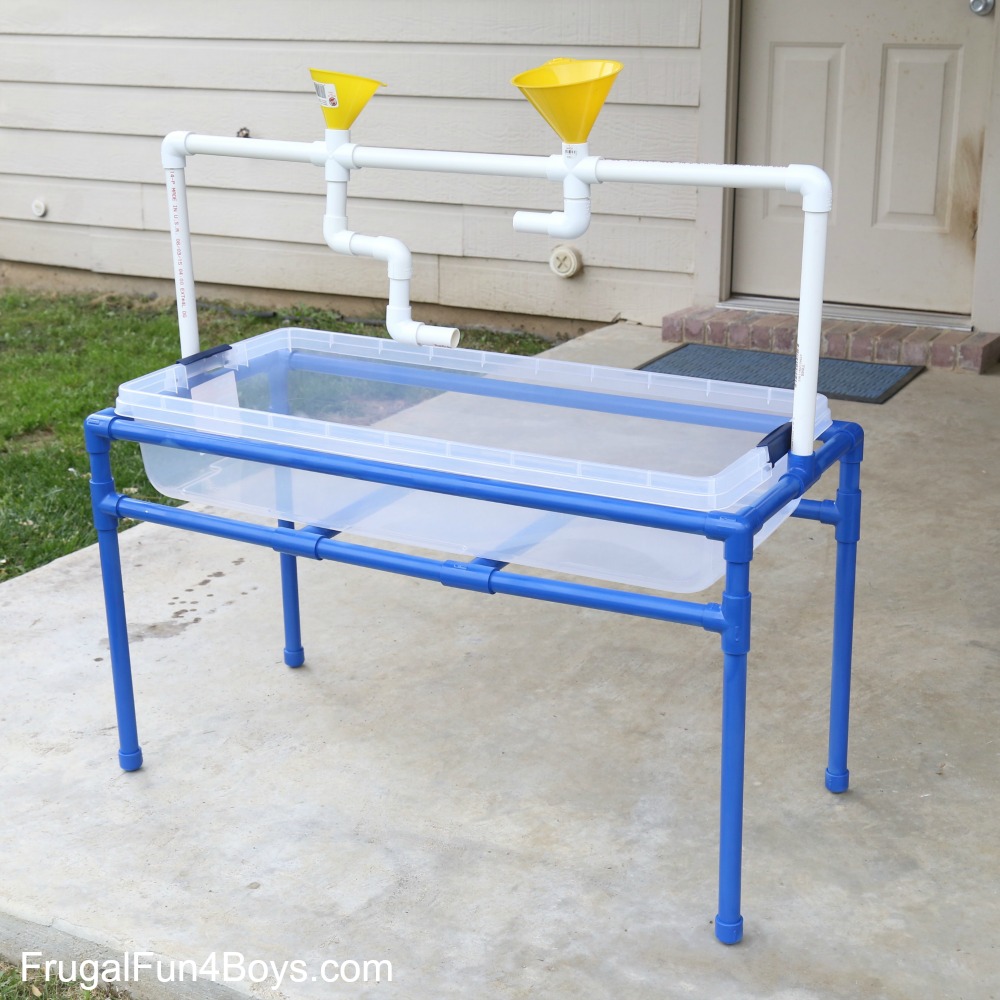
I saw this idea on Pinterest via Southern Bell DIY, and we adapted it to add a pipe across the top for funnels.
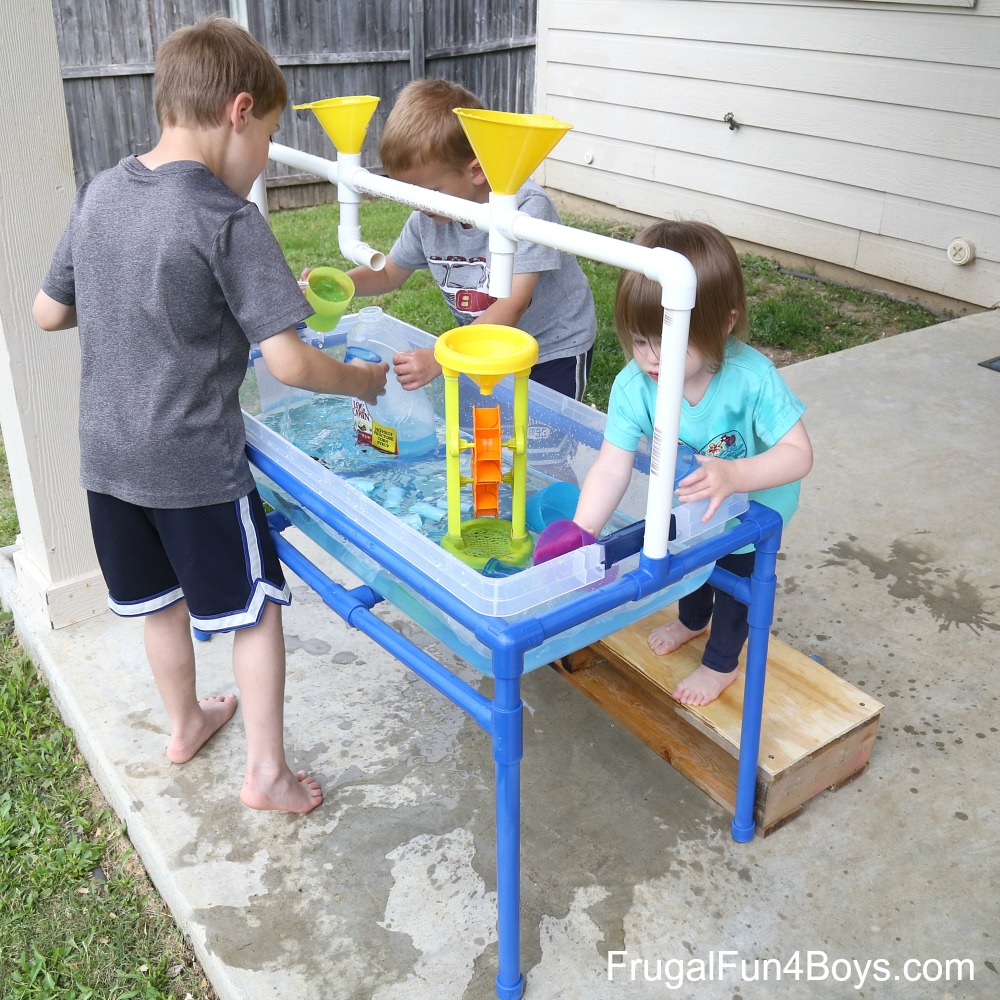
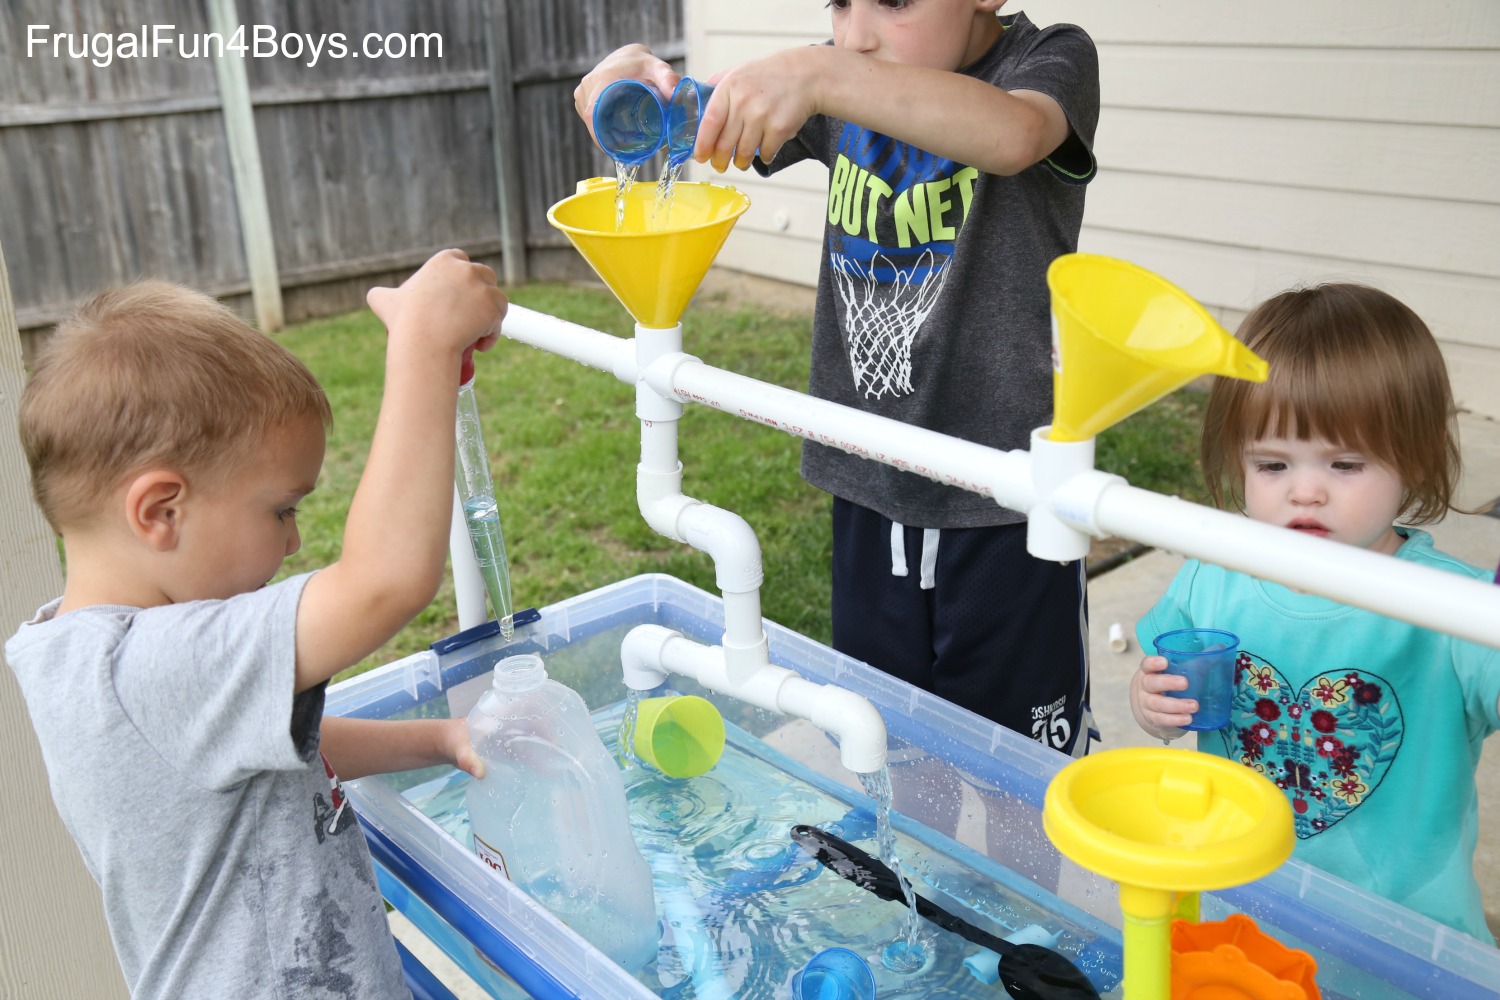
I put out a few extra pipe sections and elbow joints so that the kids can build different pipe arrangements.
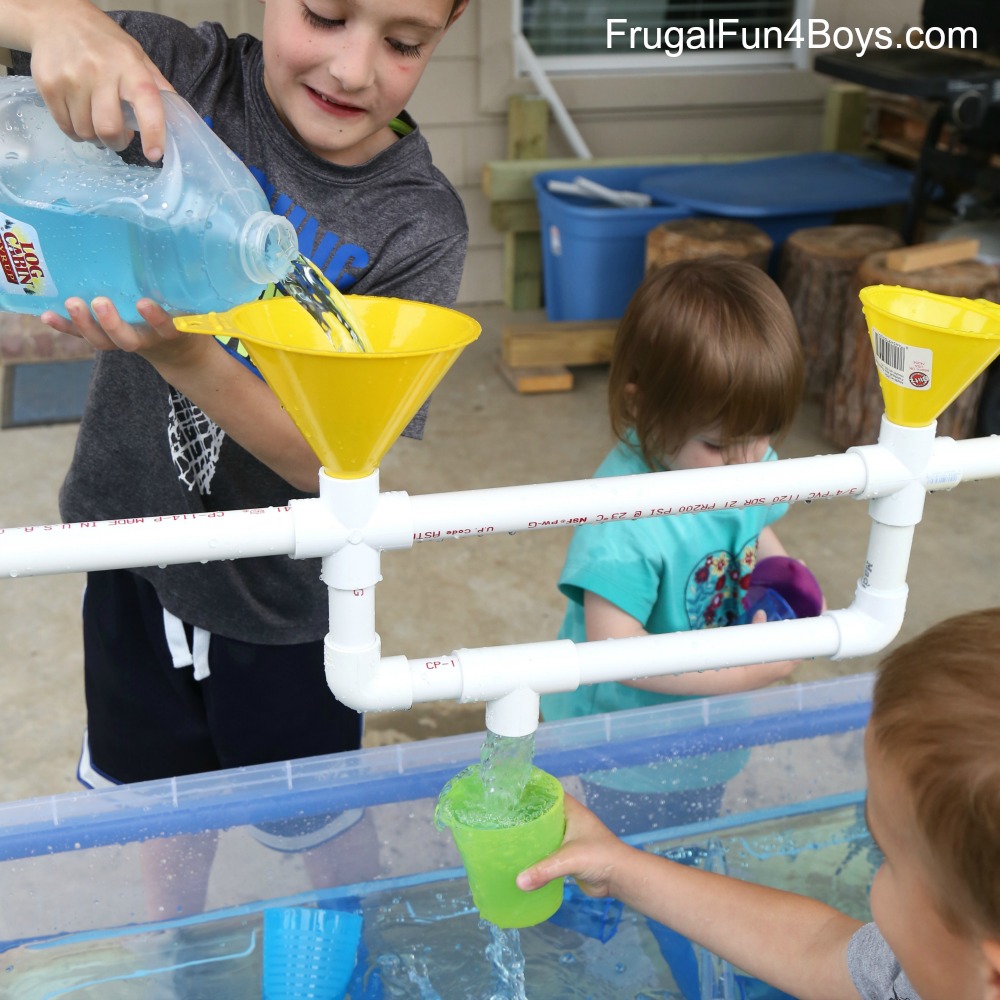
It’s a TON of fun! We colored the water blue with a few drops of food coloring to make it look cool, although we don’t do this every time. It did not stain hands at all.
I bought two tubs so that we can have one just for sand and one for water, or other things since we don’t store it with water in it. We might fill it with colored rice sometime! Or dry beans, or small rocks. Lots of possibilities.
We played with sand with the top pipes removed.
But then dry sand is fun with the funnels and tubes across the top of the table as well!
Ready to build one? Here’s what you need:
We used 3/4 inch PVC pipe.
- 14 T joints (this is based off the design update below)
- 4 elbow joints with three pipe openings (for the top four corners)
- 8 elbow joints (for the funnel area across the top)
- 4 caps
- 2 cross joints
- 4 – 10 foot PVC pipes
- PVC pipe cutters
- Spray paint
- PVC glue
- Two under-the-bed tubs
UPDATE and DIMENSIONS: Thanks to all of you who are loving this project! Many have asked for more dimensions, so here they are. Our tubs are 35.5 inches long, 16.5 inches wide, and 6.5 inches deep. The lid adds a little more height to the box.
Our table is glued together and the pipes are inserted into the connectors (so there is some overlap), but here is our best estimate on the dimensions. You may need to adapt this a little depending on your tubs and the height of your kids.
Length of the legs: cap, 14.25 inches, T connector, 2.5 inches
Sides: 11 inches, T connector, 8 inches, T connector, 11.25 inches
Top Sides: 34.25 inches
Tubes under the tub: 14 inches
Ends: 6.25 inches, T connector, 6 inches
Ends, lower pipes between legs: 13.5 inches
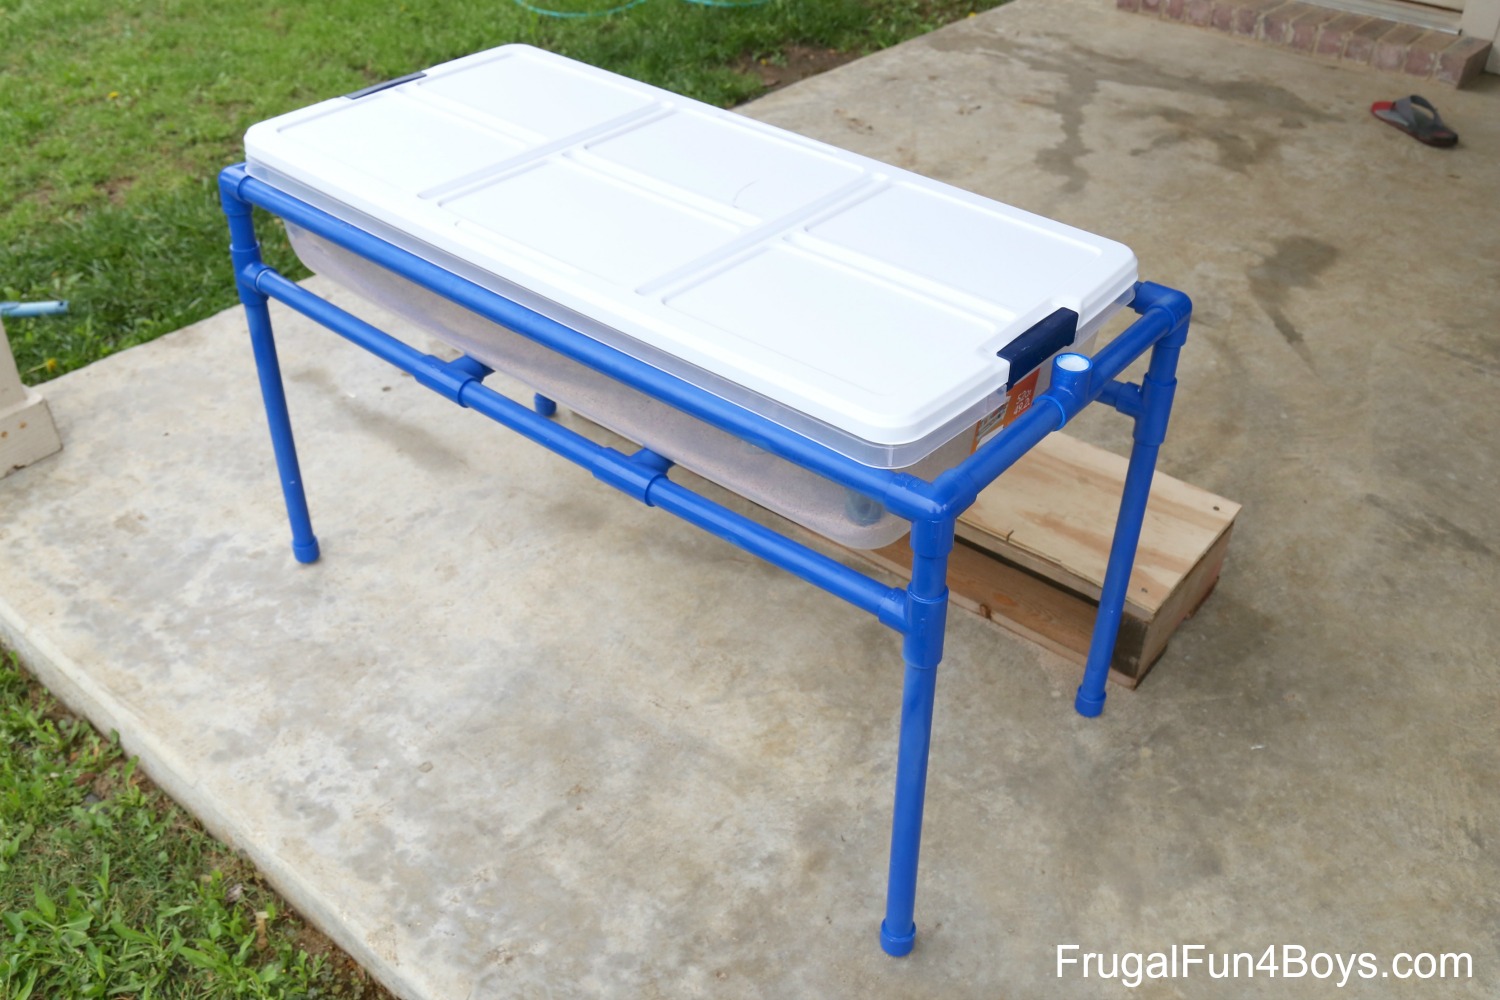
This photo shows the basic design, but we hadn’t added the pipe over the top yet.
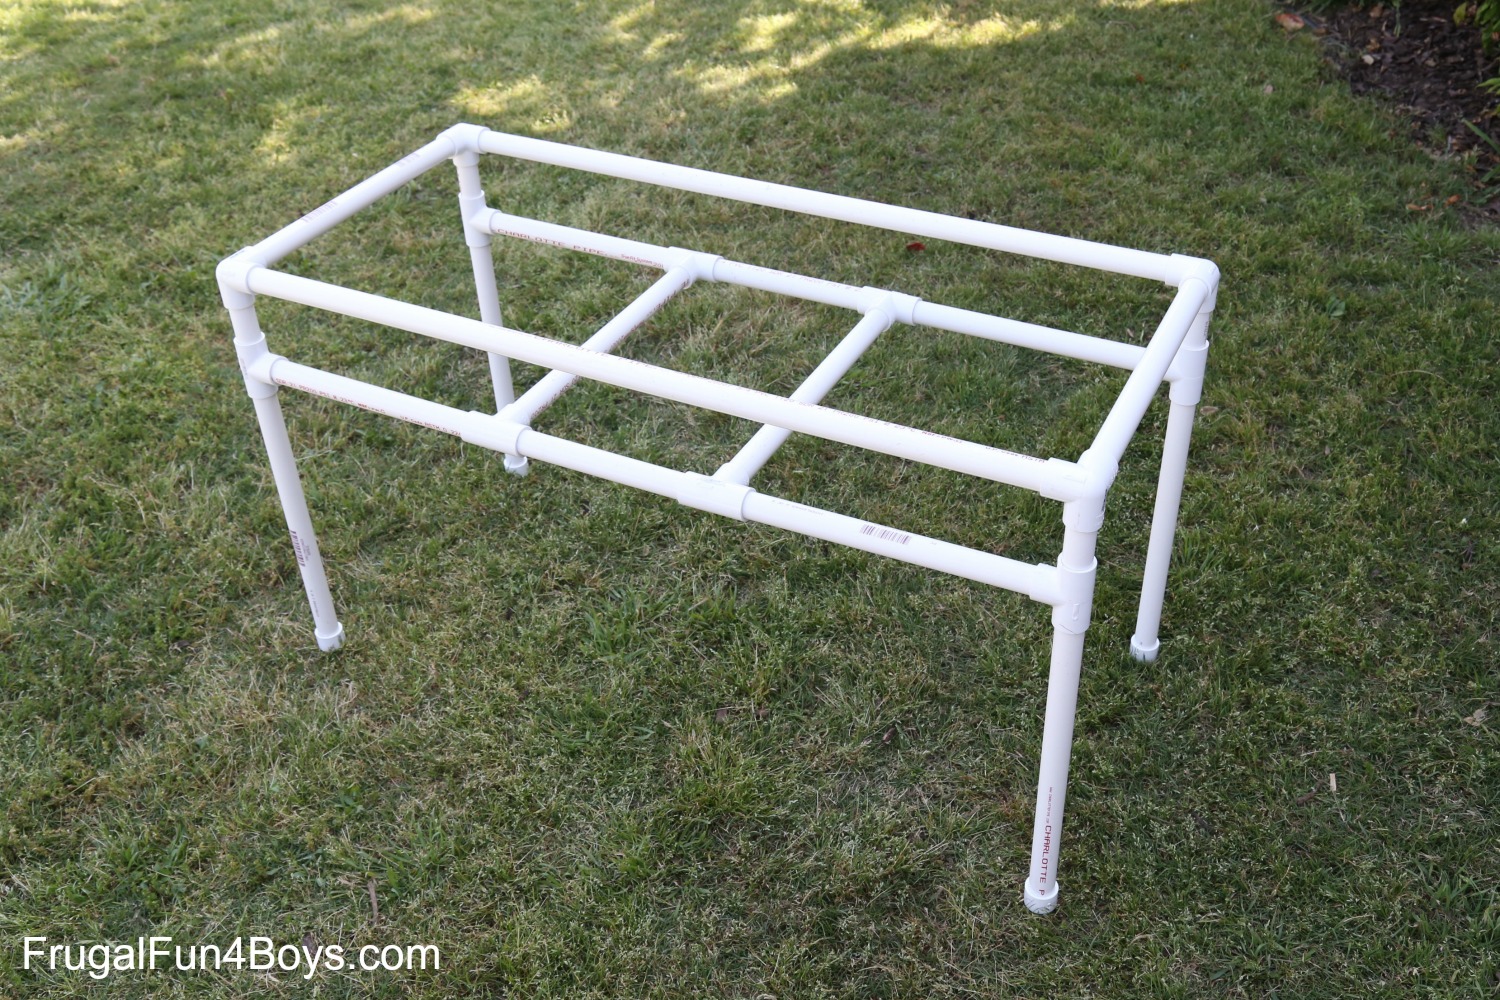
UPDATE, 2017: When we pulled out our table for its second year of use, we decided to add a pipe across each end for extra stability.
I would definitely recommend adding this to the design, and I’ve added the extra parts to the list above. It makes the table less wobbly.
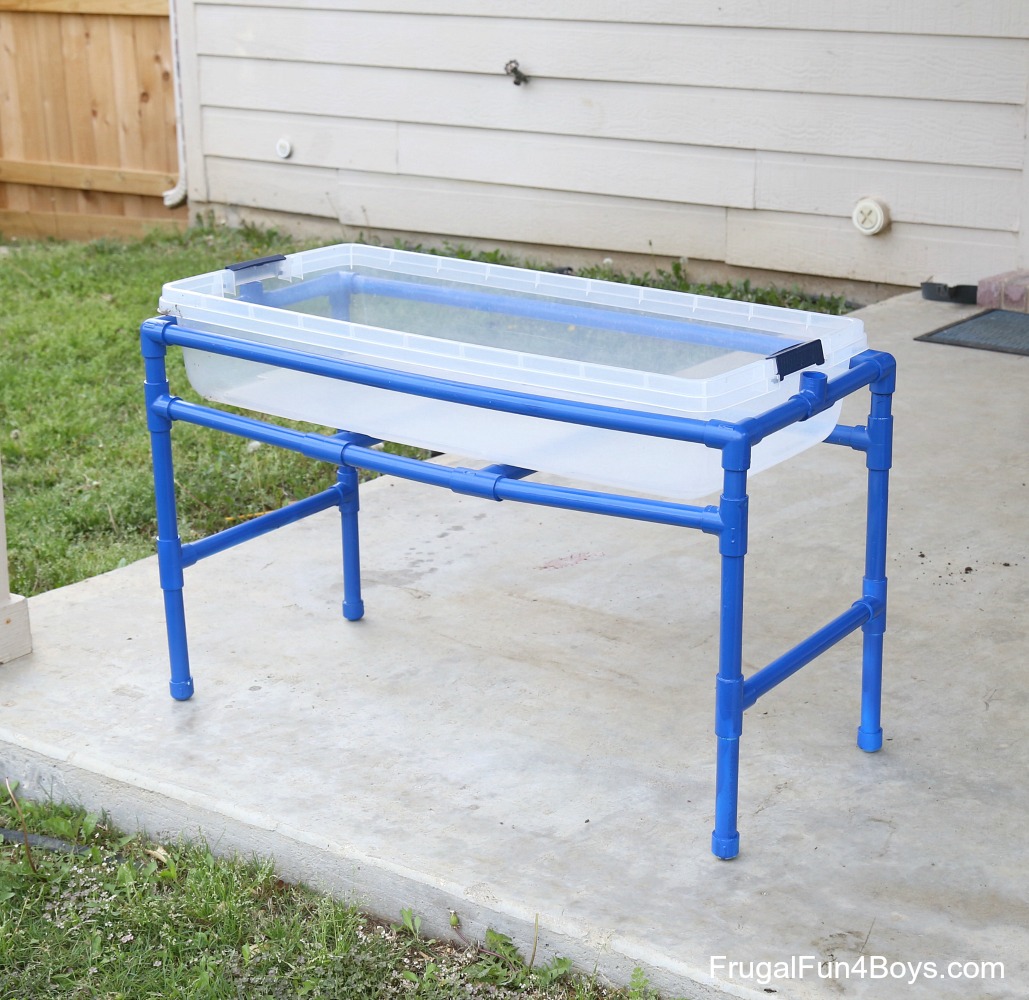
We decided to spray paint the bottom of the table blue, and I love the way it looks! At first, we did not glue the pipes together. This did not work because those tubs of water and sand are HEAVY! The table started sagging and swaying. Jordan glued all of the joints with PVC pipe glue except the ones that hold the pipe across the top so that we can play with it either on or off. The glue made a huge difference – I would not skip that step.
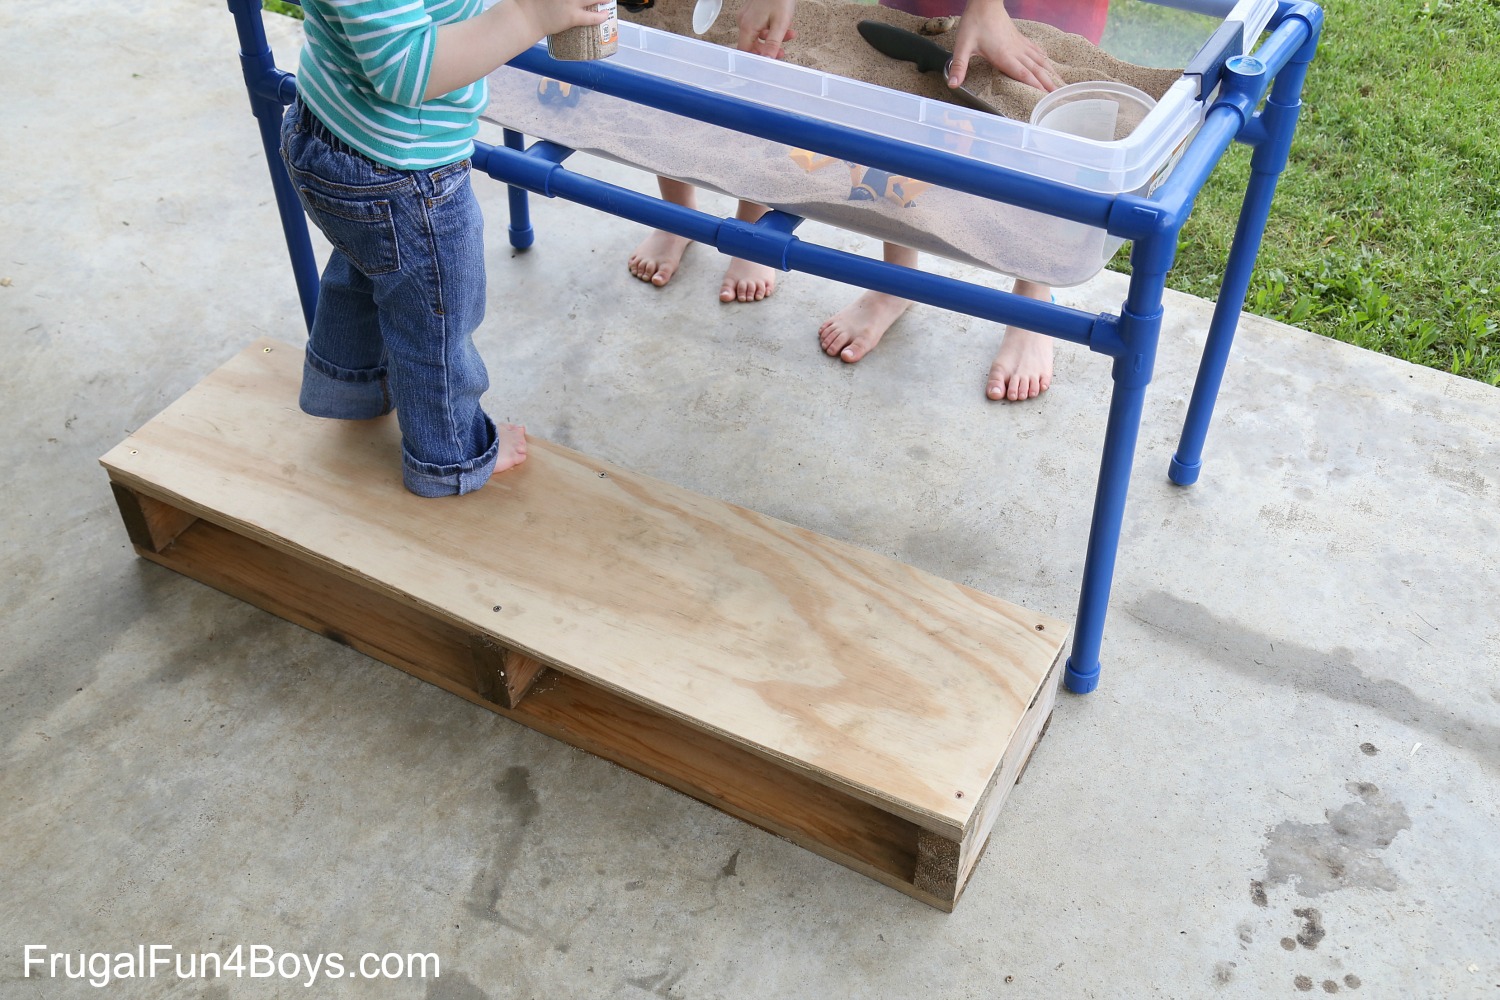
We chose the height for our table based on what was comfortable for our 4 year old and yet not too terribly short for our 6 year old. Then we built a step stool for the 2 year old. We were afraid that if we built it her height, no one else would be able to comfortably play with it, and she would quickly outgrow it anyway.
Her step stool is a pallet left over from our American Ninja Warrior course with plywood on the top. We sanded it down well.
For storage of the water tub, we dump the water out and then set the tub and toys in our garage to dry. For the sand tub, we snap the lid on to keep out rain and neighborhood critters.
Have fun building a sand and water table – your kids are going to love it!
Want more warm weather play ideas? Check these out!
89 Comments
Christina @There's Just One Mommy Apr 20, 2016
I love this! We have our small water/sand table from when the kids were toddlers, but at almost 7 and 8 it isn't comfy to use now. I may need to get my husband to the hardware store to buy supplies to build this!
Lori Apr 21, 2016
What are the dimensions of the plastic storage bin?
Sean Simko Apr 21, 2016
The tote looks like a Hefty 52 Quart that is from Walmart.
http://www.walmart.com/ip/Hefty-52-qt.-Storage-Container-Set-of-4/35819460
Sarah Apr 21, 2016
Yes! I think that's it. We bought ours at Lowe's but it is Hefty brand.
Rebecca Apr 21, 2016
I would love to hear the actually cuts you made and the size of the totes that you purchased.
Stephanie Apr 21, 2016
I too would love the actual cuts of the longer pipes and the storage bin size. :)
Jb May 7, 2019
I followed the measurements given in the description and it came out perfect. The only part I had to wing was the curves on the top water funnel.
Priya Apr 21, 2016
Great! Wanted to build it to my Toddler too...Can i know the dimensions of the Tub too, so that will go with the exact measures of yours to build it. Easy Construction too..Thanks very much.
Shanna Apr 10, 2022
Just buy the tub and measure from there
Stephanie Apr 21, 2016
as everyone else stated.. I too would love the actual cuts of the longer pipes and the storage bin size. ?:)
Sarah Apr 21, 2016
To all who are wanting to know - our tub is 35.5 inches long, 16.5 inches wide, and 6.5 inches deep.
Our table is glued together and the pipes are inserted into the connectors (so there is some overlap), but we came up with our best estimate on the lengths. Note that you might need to adapt this to your container or the height of your kids!
Length of the legs: cap, 14.25 inches, T connector, 2.5 inches
Sides: 11 inches, T connector, 8 inches, T connector, 11.25 inches
Top Sides: 34.25 inches
Tubes under the tub: 14 inches
Ends: 6.25 inches, T connector, 6 inches
I hope that helps!
Leigh May 23, 2016
how many of each though?
Leigh SEHR May 29, 2016
or am I reading it wrong?
Sarah Laliotis May 26, 2018
I'm just curious these measurements make your table only about 16" tall is that correct? It looks taller
YEN Consultas Feng Shui Apr 21, 2016
I love this! What a great idea!
Greetings from Spain
3LittleBirds Apr 22, 2016
I showed this to my husband several days ago and last night he stopped at our local home store and surprised me by getting all the supplies to build this! We are going to surprise our kids by doing it this weekend when they are at their grandparents' house. Thank you so much for sharing, as well as providing the exact measurements! This will be a hit all summer long, I am sure. Oh, and I have always hated our little turtle sandbox but my kids love playing in the sand, so this could be just the replacement we've needed!
Cheyenne Jun 14, 2016
How much was the total cost for the pvc pipe and tote?
Annga Feb 24, 2024
When my daughters were young we used bags of rice. Not as messy as sand and they loved it! Just purchased multiple bags of the cheapest rice I could find. They loved the texture of running their hands through it.
Joyce Apr 22, 2016
Great ideas. We will build a reasonable facsimile. However your name - and including little sister as an afterthought - is off putting. We have a number of little people in our world and we try our best to be all inclusive and gender neutral. A fair and equitable space shows love and respect.
Sarah Apr 22, 2016
Hello, thanks for commenting! This blog is called Frugal Fun for Boys because at the time I started it I had three boys. Then we had another boy, and then two years later a girl. When I named the site, I never imagined that people would take it to mean that girls are excluded! Of course girls will enjoy these activities too. As a mom of so many boys, however, I know that it is helpful to have ideas that boys will go for!
Elisabeth May 24, 2016
I agree- I have 3 boys (9 and under) and a 4th boy on the way. I find it easier to entertain my niece (with coloring, painting, playdough) when she comes over but my boys are active and need much more active things to do- constantly. I understand girls do as well, but from all I've seen- not to the same extent as boys with the constancy especially.
I would never have assumed you were excluding your daughter with the name for this blog and I landed here precisely because I have many boys to entertain and was actually drawn to the name. So glad I did- I've been using SOO many of your ideas since I found it so thank you for sharing!!
A Goode Jul 14, 2024
I completely agree, I have 3 boys 1 girl... your title of this blog is not off putting, but draws me to it for the sake of the the fact that my sons do have different interests than my daughter. That being said I know all my kids will love this half! Thanks for all your generosity sharing these fun but affordable creations and ideas. As a one income family with 4 kids we need to have more frugal ideas😉 God bless you!
Lyndsey Apr 29, 2025
I only have girls. Your sites name did not steer me away from your site! Fun is fun you either want to have it or not. Thanks for the post!! Going to Home Depot tomorrow!!
Marianne Calame-Berger Apr 22, 2016
Love the idea! I see your little girl playing with it. I think if you called your site frugalfun4boysandgirls.com you might get twice the traffic.
Amy Apr 22, 2016
I hope you don't let these "gender sensitive" people get you down. I am betting you named the blog before you had that sweet girl! A 1,000 happy people will see this and not say anything, especially anything negative because we know it's non of our business or it does not even show up as a though in our head, it's sad when the ones who take the time to say something are discouraging. Us happy people will have to step it up! Good Job! Thank You! Keep up the Good WORK!!
d.t. Apr 22, 2016
i agree, those are just completely bizarre comments to receive. thanks for the project idea!
Sarah Apr 22, 2016
Yes! The blog is five years old, and our daughter just turned two. I'm actually thinking of starting a site just for her! When I chose the name, I had no idea that people would take it to mean that girls are excluded. I was just sharing ideas that boys will go for since I had so many of them, but of course girls will love these things too! Thank you for your kind comment.
Jill Jul 21, 2025
I know those is several years after the fact. You're ideas are awesome, and your name is not off putting in any way at all! Don't let idiots like the one that wrote the original comment ruin your day! They are just on the internet to try to hurt and ruin people's days.
Karen May 14, 2016
Amy, I don't even know you, but I LOVE YOU!!!!! Yes, us happy people need to step it up ~ I LOVE LOVE LOVE this idea and am intelligent enough to make one for my granddaughters if they want one too, though I will be making one, with my hubby, this weekend for our grandson's birthday. I so very appreciate people who take their valuable time and share a great idea for the rest of us. Amy's comment ~ please take it to heart. Know there are tons of people loving your idea.
Kelly Apr 22, 2016
I am wondering what the approximate cost to make this is. Great idea and I love how you included each of your children! ;) Kelly
Sarah Apr 22, 2016
We spent $70 to make the table, with the tubs taking up $30 of that (two Hefty under-the-bed boxes at $14.99 each).
Lisa Legaspi Jul 10, 2023
just bought all the supplies at Lowes. I only got one tub and did need to buy the pipe cutters and the glue as we didn't have those items. Total cost was $126, which is a value compared to similar products online. And this one will be nicer!!
Theresa Apr 22, 2016
Great ideas I will be sharing this. The pop up ads will not let me see the other pages though
Stephanie Apr 22, 2016
I love your website. As a mother of three little boys it's nice to have ideas that appeal to them! Quick question, what is the thickness of your pipes? 3/4'? 1"?
Sarah Apr 23, 2016
We used 3/4 inch pipe. Have fun!
Hannah Apr 23, 2016
What are the dimensions of the pvc pipe you used across the top of the table?
Also any instructions on how you built the step stool?
Sarah Apr 23, 2016
All of the dimensions have been added to the post right after the supply list. For the step stool, we just used a section of a wooden pallet. My husband picked up some free pallets from Craigslist and one of them just came this size. Then my husband cut a piece of plywood to the size of the pallet to make the top of the step stool. I hope that helps!
Kate Apr 23, 2016
I am so unfamiliar with making things lol. Do you have the hardware store cut the pipe or do you have to do that at home?
Also connectors that the top pipes go up from, I see they aren't shown in the basic design and was wondering if it was just glued to the top of the pipes? Thanks
Sarah Apr 23, 2016
Yes, you will need to cut the pipe at home. If you purchase a pipe cutting tool (ask someone at Lowe's or Home Depot to help you find one) it makes it much easier! For the connectors that the top pipes attach to, we cut the top pipe into two sections and put the connector in between them. We had to trim a little length of each pipe to make them fit. The final dimensions are given in the post above. I hope that helps!
Erica Apr 23, 2016
Where did you find the cute waterwheel that is inside? Also, the measurements you gave-- does that include the overhead pipes?
Thanks so much!
Sarah Apr 25, 2016
The water wheel was from Target, probably two years ago. I checked the other day, and unfortunately the don't seem to have them this year! The measurements given do not include the overhead pipes. You can really do whatever you want for those.
Laurie May 9, 2016
They have similar water wheels on Amazon if you cannot find something locally.
Jessica Parsons Apr 23, 2016
THANK YOU so much for posting this! I'm not very much into completing projects, but thanks to your awesome pictures my twins are LOVING this water/sand table.
*Went to Lowe's for our supplies.
Sarah Apr 25, 2016
That's awesome! So glad your kids are enjoying it!
Phuong Apr 24, 2016
This is the best water/sand table I've ever seen. Thank you for the dimensions. I will definitely make this for my boys this summer. Maybe I'll provide more little parts for my boys to reconfigure the top piece and paint them different colors since my 3yo is so into colors and shapes right now. Or hang mini swings and platforms to put little cars/trucks on. The possibilities are endless!!
Phuong Apr 24, 2016
I could fill a bin with rocks/gravel too. Or take it indoors and fill with uncooked pasta or dried beans.
Sarah Apr 25, 2016
Yes, fantastic idea!
Jillian Apr 24, 2016
Any thoughts on adding a plug to the bottom of a tub for draining the water? Or how do you normally empty it to reuse or put into jugs?
Sarah Apr 25, 2016
The tub is too heavy to lift out and pour out the water, so we have been scooping the water out with a pitcher. Then when it gets down to the bottom we just pour it out. If the tub were attached to the frame I would think about a drain, but I think it's probably not worth it.
Lisa Willett Apr 25, 2016
I really love the idea and we are planning on making two tables for my family child care program this summer. I am having a little trouble finding a container that is 35 inches long. I have only been able to find one that is 29 inches long. We could adapt the size of the PVC but I wanted to ask first if you could say where you found your containers. ?
Sarah Apr 25, 2016
Our containers are Hefty brand from Lowe's. Another commenter found them online at Walmart if you don't have a Lowe's nearby. You can find the link higher up in this thread.
Justin Apr 25, 2016
Hey just bought everything I need! Got the exact size tote at Walmart it's an under the bed storage. I just had one question. I got all the sizes but I don't see the size of the small piece that comes out of the T from the leg and into the elbow with the outlet (3 pipe openings)
Sarah May 1, 2016
Yes, so sorry! We forgot that piece when measuring! The small piece at the top of each leg should be 2.5 inches. So from bottom to top, it's a cap, then 14.25 inches, the T connector, then 2.5 inches.
Glenn Rainer Apr 25, 2016
My grandDaughter will love this! Thanks for sharing!
Tonya k Apr 26, 2016
Curious what the final cost was.
Sarah Apr 28, 2016
We spent $70, with $30 of that being the cost of the two under-the-bed tubs. They were $14.99 each.
Anita Apr 26, 2016
Are the pipes across the top and the vertical pipes on the ends solid so that the water doesn't go all through the frame? I was super excited to see this and we're considering making one for our summer camp program.
Sarah Apr 28, 2016
The pipes across the top and the vertical pipes are not solid. The water doesn't seem to really flow through the frame, though. I don't think that there is water down in the frame, but I will check!
pizzalover Apr 28, 2016
Your sand & water table is so awesome! Thanks so much for sharing. Can you please clarify what the dimensions below means? If it's not too much trouble, perhaps a drawing labeling the different dimensions of the pvc pipes would be really helpful. Im not sure how many of each cut I need and how it is all put together.
Sides: 11 inches, T connector, 8 inches, T connector, 11.25 inches
Ends: 6.25 inches, T connector, 6 inches
Also, which pvc glue did you use?
Kara Elias Apr 28, 2016
I'm going today, hopefully, to get the materials to make this great project! Thanks! I have a question... how do you keep the sand/water from flowing to the sides down the white pipe, instead of going down into the bin? Is there something in the pipes that keeps it from going to the sides? Hope that makes sense.
Kara Elias Apr 28, 2016
Oh, I see this was asked above :)
Pam May 1, 2016
Thank you so much for posting this! I'm just wondering about the legs. You give just one length in your dimensions (14.25), but there are two pieces there (one long one that goes from the ground to a T connector, and one short one that goes from the T connector to the top corner piece). Does that length include both parts of the leg? I'd appreciate some help on this! (My children are the same ages as yours, so I think the height you use will probably be perfect for us too.)Thank you!
Sarah May 1, 2016
Yes, so sorry! We forgot about that little section. That piece is 2.5 inches. So it should be (from bottom to top) cap, 14.25 inches, T connector, 2.5 inches. I have updated the post with that information.
Becca May 11, 2016
How much sand is a good amount? I put it into a converter and it said 52 quarts is equal to 156 lbs....even half would be a ton...
Sarah May 11, 2016
We bought a bag of play sand and I used maybe 1/4 of the bag. Not much - an inch or two in the bottom of the tub. Not sure how big the bag was - maybe 40 lb.? It was the only size at Lowe's.
Meghann May 14, 2016
I saw your post and knew that I had to make this for my soon to be 4 year old son. I am lucky enough to spend the summer off from work with him being a teacher and all so we are excited to get started. I just bought all of the materials for this and your pricing was spot on at about $70. I did want to ask though.. your supply list on your page, does that include the attachments for the piping that goes on top to put the funnels in or do I need to go back and buy more for that? This is going to be so perfect for our deck. We live in an apartment and have little space of our own outside, but this will fit perfect. Thank you so much for sharing this with us!!!!!
shubhdha May 18, 2016
i liked the idea however I found out a table with adjustable height and similar price range at Lakeshore Learning store. They always have coupons which can be used. sharing the link if anyone wants to avoid the task of making a table. Check this out :
http://www.lakeshorelearning.com/product/productDet.jsp?productItemID=1%2C689%2C949%2C371%2C896%2C200&ASSORTMENT%3C%3East_id=1408474395181113&bmUID=1463622106193
Reggie May 21, 2016
Thanks for the great idea! I purchased the under-the-bed bin from Lowe's and it had slightly different dimensions and ultimately had to modify the sizing. For all those that are concerned about the height (as was I), I added a threaded coupling to the legs so I can shorten or lengthen them later.
Polly May 22, 2016
Hello Sarah, how clever is this water table. Working with kids for 22 years I think this would be such a hit. Also, it looks pretty simple to build. If it were me I would have told 3 little birds and Joyce that if the name bothered them they shouldn't use your ideas. You handled it much more diplomatically. Hats off to you!
Jason May 22, 2016
To the best of my knowledge I followed the direction to a "T" and has anyone else found that the 34 1/4" (35 3/4" full-lenght) Top side pipes are too short? As a rule of thumb you can add 1 1/2" to each of the diminutions listed above to accommodate 3/4" each end of the pipe will fit into a joint.
Elisabeth Taylor May 24, 2016
Seriously could not LOVE this more! Just bought all the things needed and will build tomorrow. My boys are sooo excited! Thank you for sharing this!
Sarah May 25, 2016
Awesome! I hope they have a great time!
Terry Smith May 25, 2016
I absolutely love the table. Gathered up the parts to make one for my 3 grandsons. Just wondering, since my grandsons have such a variance in height, what was the overall height you came up with, (from ground to top of plastic bin). I cut the 14.25 length legs, plus adding on length that goes into fitting, and the tub still seems awfully low even for my 2 year old.
Thank you so much,
Terry
Sarah May 25, 2016
Our table is 23.25 inches from the ground to the top edge of the tub. My 2 year old is about 32 inches tall, so she has to stand on something to reach the table comfortably. If your grandsons are taller, you can always make the legs a longer! I hope that helps!
Terry Smith May 25, 2016
Sarah,
Thank you so much for the dimension. I was going to make the height 24" but had a hard time reaching that height with the 14.25" legs. I must have been doing something wrong. But your height of 23.5 inches from ground is perfect and I can adjust parts to make that height. I can always cut legs and add spacers if kids get too big.
Just returned from Lowes picking up bag of 50lbs of play sand. They have it on sale for $2.50 a bag.
Thank you again Sarah, you have been wonderful. Hope to see more creative projects from you.
Terry
Kim May 30, 2016
Approximately how much does it cost?
JC May 31, 2016
Hi! I actually made the water table above from your instructions and I just wanted to update with a few hints in case anyone else is trying to make this :)
We got everything from Lowe's, and ended up only needing about 25 ft of PVC pipe. We used 3/4" schedule 40 pipe for extra sturdiness and also it is easier to cut than the thinner-walled PVC pipe.
We changed some dimensions from the ones you gave, because the tub did not fit otherwise:
a) Sides: 11 inches, T connector, 9 inches, T connector, 11.25 inches
b) Ends: 8 inches, T connector, 6 inches
c) Tubes under the tub: 15.75 inches
Please note the first change was to make the top and bottom of the sides line up, and the last two changes were because the tub was slightly too wide and would not fit. I think we got the same brand tub as you did however :)
Total cost $65 (we only got one tub)
Hope this helps for anyone else trying to make this. It was so fast and easy and I really appreciated the detailed instructions!!
JC
PeteM May 31, 2016
If you are using water, drill holes in the four caps on the bottom of the feet to allow water to escape. Otherwise it sits and grows Things. I made a simpler construct for a 2-yo that has no legs, just the horizontal cross members. Works just fine. She don't know the diff!
Sarah Jun 14, 2016
That is a fantastic tip! We have been just tipping our table frame upside down every now and then to drain out the water. But I like this idea even better!
Joy Jun 11, 2016
With pouring water in the top of the pvc where the funnels are how do you keep the water from going into the legs? Not the part that is going into the tub, but the pvc that is holding it up. Let us know as we are in the process of building this right now. Thanks so much, its a great design!
Sarah Jun 14, 2016
We have really not had much water go into the legs, but a commenter above suggested drilling a small hole in each cap (at the bottom of each leg) to let the water drain out. We turn our table upside down every now and then to empty out the water, but I like this idea even better!
Lisa Quinn Jun 18, 2016
We made one of these last night but left the top pieces unfinished. We gave our 3yo a bunch of pieces of pipe and extra fittings. He is building all kinds of stuff to put water through! Thank you so much for this awesome tutorial!
Steve Jun 18, 2016
Any measurements for the pipe that goes over the top of the table? With the funnels?
Cindy Jun 18, 2016
Just completed my water table and I am super proud! Thank for the informative blog that stated all the measurements exactly!!
Tiffany Jun 25, 2016
How did you get your table not to bow? With water it slightly bows and with sand it bows even worse.
Sarah Jun 25, 2016
Ours does bow some under the weight. So far (we've had it two months) it has not been a problem. We only have a couple inches of either sand or water in the table, or it's just too much weight. That amount of sand or water has been plenty to play with though!
Hannah Jun 28, 2016
Just a heads up for anyone in Canada having a hard time sourcing pieces.... Lee Valley Hardware has all of the necessary parts. We couldn't find the pipe with the three way opening at Home Depot or our local plumbing store.
Monali A Jul 17, 2016
Thanks so much for this awesome water table idea with detailed instructions. We build one over this weekend for our son. He loves playing in water and will be so happy to see it ?..
lAUREN Jul 24, 2016
hi is it 40 ft of pvc piping that is needed? i just priced it and its coming in at $70! thanks
Sharon Jul 27, 2016
Hi - we looked at white PVC ventilation pipe 3/4" and it was quite flexible and seemed far too flimsy for what you have pictured here?!?! Can you tell us what type of 3/4" PVC Pipe you have used? Is this PVC Conduit? What purpose was the pipe originally meant for?
Sarah Aug 1, 2016
This is the pipe that we used. If I were doing it again, I might use a heavier grade, but then that would mean that the project would cost more, so I'm not sure. Ours has held up fine other than that the pipes in the center sag a little. I would also modify the design to have a pipe that runs between the legs on each end, about 4 inches up from the ground. That would stabilize the table a little more.
http://www.lowes.com/pd/Charlotte-Pipe-3-4-in-x-10-ft-480-PSI-Schedule-40-PVC-Pipe/3133085
Julie Morris Sep 19, 2016
How sturdy is this table? I have a tall 4-year-old who is still learning to stand independently. Would this be strong enough for him to use to pull himself up and lean on, or do you think we would need to make one out of wood?
Sarah Sep 22, 2016
I think that this would not be the best option to lean on, unfortunately. I think that wood would probably be better! One thing that would make this more sturdy though is to add pipes a couple of inches up from the bottom of each leg that would go across the ends of the table. If I were building one again, I would add that extra step just to make it more sturdy overall. I hope you find something that works!
Melissa Nov 21, 2016
This is GREAT! I am not seeing measurements for the addition you made to go over the top... did I overlook it somehow?
Simon Nov 25, 2016
Made one of these today for our 2yo, using your pictures as a guide. Used the same size 20mm pressure pipe. But had to cut at different lengths to suit the container I brought. Also added a support bar on the side and a third leg on each side for added support for the weight.
I would upload a photo but unable to on your site.
Thank you for the idea 2yo can't wait to try it out but need to let the paint dry.
Curtis St Martin Apr 23, 2017
I think that the water table thing is a pretty neat idea. Looking at the pictures and the size of the kids that pipe looks bigger then 3/4 inch. JMHO but I think I'd go for 1- 1/ 2 inch pipe at least for the base, and 3/4 for the top. The 1-1/2 inch base would be a lot sturdier and last longer over time.
Sarah May 14, 2017
Hello. Do your updated dimensions and directions include the bottom cross bar you added in 2017? Thank you!
Jerri Dyke May 15, 2017
Thank you! I appreciate the update for 2017. The paint really add something to it.
I have two grandsons who are always looking for something to do when they are at our house. This is perfect. I love reading your articles and they are always so helpful & practical. Thanks again !! ????
Emily May 22, 2017
We did it! Followed your directions, altered the height, and it was perfect. Perfect deck entertainment! Thank you!
Heather May 29, 2017
We made it this weekend. Thank you so much for posting. I wish it would let me upload a picture. My kiddos love it.
online shopping Jun 9, 2017
Thanks for sharing your thoughts on business card software uk.
Regards
KY Jun 24, 2017
I've been wanting one of these water tables ever since I saw it, and after waiting WEEKS for my husband to build it, I finally seized the bull by the horns and went to Lowe's to get the materials myself. I didn't realize that PVC came in 10' lengths, which clearly wouldn't fit in my car, nor did I know how many types of joints were available for PVC. Just as I was about to give up, an amazing Lowe's employee came to my rescue. This lovely man took an interest in the project (I had printed out pictures of the table along with the parts list), and he not only offered to cut the PVC into the lengths needed, but he began to assemble the table itself. Within a half hour, two other employees stopped by, and all three of the men eagerly took over - I left the store with a fully assembled table, and only needed to paint it when I arrived home. Thanks for the plans, the pictures, and thank God for Lowe's!
Brenda Jun 26, 2017
My grandkids love this. We added center legs for the water since it bowed.
Thanks for the great idea
Sara Jul 23, 2017
Hi, my husband is attempting to build this right now and I was wondering what the brand name of the tub you used is and where you bought it?
Also, do you have a step by step guide for assembly?
Thank you so much!
Katrina Sep 11, 2017
This project was so much fun! I used extra PVC length to make a "shower bar" with small holes in it. It's my 2yo favorite! Also bought a valve connector so the kids can control the water flow. I did NOT glue the pieces, as being able to break it down was important. It does bow under the weight quite a bit though, so I flipped over a storage tote & slid underneath to provide extra support. I labeled the pieces & store it in that tote when the season is over. The kids played with this almost daily all summer!
Felishia Hoffecker Oct 9, 2017
Is the list of the supplies just for the table? Or does that include the pipes for above and the finals?
Kevin Dec 4, 2017
My wife found this page, and I'll be building a PVC table for our kids shortly. Thank you for sharing your awesome idea!
Kevin Dec 4, 2017
Just noticed though, I think your parts list is missing the 2 T joints used in the top (white) funnel section.
14 Ts are used for the blue part (8 to support the bin, 4 for the added end supports, and 2 to hold up the top white section), but then there's also 2 white Ts shown in the photos.
(Yep, I am counting parts before running to my local hardware store for a build!)
P.S. Thanks for giving me an excuse to buy a PVC cutter. No fun using a hacksaw on PVC for sprinkler fixes.
Julie Prince Mar 4, 2018
I just made this last weekend and it turned out great. My 8 year old, 3 year old and 17 month old all love it! Thank you for this great tutorial!
Cariann Mar 9, 2018
How to you keep water from going into the base/legs part and getting all moldy?
Sarah Mar 11, 2018
The table is so lightweight that you can easily turn it upside down when you are finished using it to empty out any water that may have gotten inside. Honestly, though, we haven't had much trouble with this!
Nicole Apr 21, 2018
I love this concept, but I just want to put out a warning to anyone trying this. The dimensions of the PVC listed are not accurate. I cut all of my pipes to the exact measurements listed and the tote will not fit (I have the exact same tote, so that is not the issue). The frame is too small for the tote. Perhaps the measurements listed don’t account for the ends of the pipes that are inserted into the fittings. I just want to save someone else the heartbreak and waste of time and money. Make sure you add a couple of inches to each measurement when cutting your PVC.
Steph Apr 29, 2018
HOw much did all the pipes cost?
Elizabeth May 26, 2018
What was total cost?
Trisha Jun 2, 2018
ImWanting to make this for my LO and have one question, how do you keep water from running down the side if the PVC pipe into the table legs? Thanks!
Sarah Jun 4, 2018
We really haven't had trouble with water getting inside the legs. If it does, the table is super lightweight. You can easily turn it upside down and let the water drain out. I hope that helps!
Alex Jun 8, 2018
3 slats worked well. No bow!
Benjamin Jun 23, 2018
Loved the look of this table, but saw your outlined problem. Kids grow (darn them!). I modified the plan to add some male screw fittings below the short-end trusses, the remainder of the leg will have a female fitting that will screw on. Multiple sets of legs for different height sprogs.
Thanks for the great starter idea.
Elizabeth Jul 10, 2018
My husband and I made this for our children (ages 4 and 2). They love it!! We had never attempted a project like this before, but we were so pleased with how it turned out!
Angeline Loh Dec 7, 2018
Hi there, I love this idea! Seems so much more elegant than wood and might be doable for not so DIY people like us ;)y question is how do you adjust or obtain the measurements of the pipes if we already have the container? Is there a formula I could use, as I think it may be hard to find a container exactly the same as yours. I already have a similar tub that is 25 inch by 19 inch for example. Many thanks!
Jenni Jun 24, 2019
We just built this and love it!! How did you prevent water and sand from entering inside the pipes?? We put our top portion up and water is definitely inside the table.
Sarah Jun 25, 2019
If water or sand gets inside the pipes, you can turn the whole table upside down and dump in out (with the tubs removed, of course). It's not heavy, so it's easy to just turn in over and let the water run out. We did not have a large quantity of sand or water getting in the pipes, though.
Kristina Apr 14, 2020
This is an amazing idea!
Mariah Apr 18, 2020
Did you spray paint after you put everything together or before cutting the pvc pipe? So excited to make! 😃 thank you for sharing
Sarah Apr 20, 2020
We spray painted after cutting the pieces and gluing them together.
Debbie Lessard May 3, 2020
We love our water and sand table! Thanks so much for the plans. We felt we needed a little more stability, given the weight of water and active children. We made ours with 3 cross bars in the basic frame, left, center and right where the plastic bins sit on top. Also, we added pvc pipes to go around the bottom that are the same length as the ones on the top. This really adds stability, even when kids are leaning against it and actively playing. It only cost a few extra dollars to buy extra pvc.
Ivana Jun 26, 2020
This is going to be my summer project. I can't wait to make it! Just curious, did you need to use PVC primer in addition to the PVC cement?
Sarah Jun 28, 2020
No, we just used the PVC cement.
April Jul 10, 2020
I just made this and it is SO much fun. Thank you for the blog on how to build it! It’s so hard to find water tables right now, so this came at the perfect time for my 2 & 4 year old.
Just a quick comment: following the measurements provided, the table ended up short on the width and length by 3 inches. I had to chop it up and add length to it, which was no big deal.
I THINK the length of the PVC inside the “connector” parts may not have been accounted for in the measurements?
Regardless, we love it.
sarah jo Jul 24, 2020
This is amazing. I am not talented or ever learned to be but I’m goi g to do this.
Thank you so much!!!
Steve Jul 26, 2020
Finally was able to source the fittings and built it yesterday for my 16 year old special needs son. He absolutely loves it! Even attracted my 19 year old son and his friend to play along as well!
Thanks so much for sharing your idea/plans on your website. Will be fun to play with for years to come.
MICHELLE WILLIAMS Aug 11, 2020
I'm making this for my 22 year old daughter with autism...what height did you do for your son? My daughter is 5'6", so I know I need much taller than the instructions show, just not sure how tall...Any suggestion?
Michael S Silvers Sep 26, 2020
anybody try this with 1/2" instead of 3/4"? We have a bunch of 1/2" leftover from a plumbing project...
Steven Shupert Mar 6, 2021
We built this with some modifications. We found the extra support and glue not to be necessary when adding extra legs, totalling six. The center brace under the bin gets better support this way and holds up much more. We ended up using 1 inch PVC for the entire bottom and 1/2 inch for the upper piece for water play. We haven't finished yet. We have plans to extend the vertical up to add a sun shade. Can send pictures when complete. Also can send useful measuring guide for when you need modifications to your measurements. Ours did due to the difference between 1inch and 3/4 inch PVC, our bin didn't fit and I had to add to the size.
DrewMa May 19, 2023
Did you ever end up finishing this I'd love to get a picture the sun shade sounds brilliant
Gemama Jun 6, 2021
I made this last weekend for my 3yo GS. I added two support legs underneath the cross bars in the middle, due to the weight of the sand. Thanks for the directions! He loves it!!!!
Hilary Apr 24, 2022
Thank you for the instructions that were detailed enough but not too rigid. My 2 year old daughter and I built one together this weekend! Thanks for this support to help me be a more handy mama and pass this confidence along to my little one!
Alison Sep 14, 2022
I made this today for my boys and it was a hit! Thank you for such a fun idea!
Esther May 11, 2023
We're getting ready to make this this weekend! Just an FYI for anyone wondering about cost in 2023 it was $125 for the PVC and bins from Lowe's, but that's to be expected with inflation and pandemic economic aftermaths;)
Alyssa Jun 13, 2023
Just got our supplies today and can confirm a similar total cost!
Sandy K. Aug 11, 2024
2024 comment: To make this table more cost effective, buy the tubs first and then measure and build your table based on those dimensions. The tubs in this design as written cost more than $20 each. A slightly smaller version at Walmart costs under $10 each. Another tip is to source your materials used and you may even find most of what you need for free.
Jack Apr 2, 2024
This saved my life I'm about to do an eagle scout project helping a camp made for kids with cancer by installing play tables and benches plus some more stuff, this helped with the play tables so much thank you. saved the whole project...
UkDad May 25, 2024
This looks great, going to try and source fittings and pipe in the UK...
Does anyone know the schedule (the wall thickness) of pipe was used please? Thank you :)
Sandy K. Aug 11, 2024
Thank you for the inspiration. It looks like this post has done a lot of good over the years! I just made one of these yesterday and plan to make a second one next weekend for a sandbox instead of switching them out. These tubs used in this design cost over $20 each at Lowe's and HD. I know they were cheaper when this was originally posted so I'm not criticizing the author at all. I, instead, purchased slightly smaller tubs that cost $9.98 at Walmart. The fittings cost about $35 per table. I adjusted my measurements to fit the tub. My cost was about $45 per table.
I had enough PVC pipes leftover from various gardening and irrigation projects for two tables so I didn't need to purchase new pipe or the glue. If I did have to make those purchases, it would add about $10 to the cost of each table. I also think it would be worth the time checking local classifieds for tubs and PVC pipe before spending the money. These are things that people are willing to give for free or very low cost. In fact, I wish I’d taken my own advice about the tubs because I found some for free today just before I sat down to write this review.
Post a Comment